面试官灵魂一问: 你知道 Babel 是如何编译 Async/Generator的吗?

polyfill 后的代码
既然想知道其原理,那么自然是要看下 polyfill后的代码的,直接到 Babel官网的REPL在线编辑器上,配置好 presets 和 plugins后,输入你想要转化的代码,babel自动就会给你输出转化后的代码了
以下述代码为例:1
2
3
4
5
6
7async function test1 () {
console.log(111)
await a()
console.log(222)
await b()
console.log(3)
}
babel输出的代码是:1
2
3
4
5
6
7
8
9
10
11
12
13
14
15
16
17
18
19
20
21
22
23
24
25
26
27
28
29
30
31
32
33
34
35
36
37
38
39
40
41;
var _interopRequireDefault = require("@babel/runtime/helpers/interopRequireDefault");
var _regenerator = _interopRequireDefault(require("@babel/runtime/regenerator"));
var _asyncToGenerator2 = _interopRequireDefault(require("@babel/runtime/helpers/asyncToGenerator"));
function test1() {
return _test.apply(this, arguments);
}
function _test() {
_test = (0, _asyncToGenerator2.default)(
/*#__PURE__*/
_regenerator.default.mark(function _callee() {
return _regenerator.default.wrap(function _callee$(_context) {
while (1) {
switch (_context.prev = _context.next) {
case 0:
console.log(111);
_context.next = 3;
return a();
case 3:
console.log(222);
_context.next = 6;
return b();
case 6:
console.log(3);
case 7:
case "end":
return _context.stop();
}
}
}, _callee);
}));
return _test.apply(this, arguments);
}
很明显,_test函数中 while(1)方法体的内容,是需要首先注意的代码
可以看出来,babel把原代码进行了一次分割,按照 await为界限,将 async函数中的代码分割到了 switch的每个 case中(为了表述方便,下文将此 case代码块中的内容称作 await代码块),switch的条件是 _context.prev = _context.next,与 _context.next紧密相关,而 _context.next这个变量,会在每个非 case end中被赋值,值就是原代码中被分割后的下一个将要执行的 await代码块的内容,当原代码中的所有 await被执行完毕后,会进入 case end逻辑,执行 return _context.stop(),代表 async函数已经执行完毕
但这只是最基本的,代码到底是怎么串连起来的,还要继续往外看
下文讲解的源代码版本:”@babel/runtime”: “^7.8.4”
流程串连
首先,需要看下 _interopRequireDefault这个方法:
1 | function _interopRequireDefault(obj) { |
代码很简单,如果参数 obj上存在 __esModule这个属性,则直接返回 obj,否则返回一个属性 default为 obj的对象,其实这个主要就是为了兼容 ESModule 和 CommonJS这两种导入导出规范,保证当前的引用一定存在一个 default 属性,否则没有则为其加一个 default属性,这样便不会出现模块的 default 为 undefined的情况了,就是一个简单的工具方法
然后继续看 _regenerator,while(1)这个循环体所在的函数,作为 _regenerator.default.wrap方法的参数被执行,_regenerator是从 @babel/runtime/regenerator引入的,进入 @babel/runtime/regenerator文件, 里面只有一行代码 :module.exports = require("regenerator-runtime");,所以最终应该是 regenerator-runtime库,直接找 wrap方法
1 | function wrap(innerFn, outerFn, self, tryLocsList) { |
innerFn 是 _callee$, outerFn 是 _callee, outerFn.prototype也就是 _callee.prototype,_callee也是一个函数,但是经过了 _regenerator.default.mark 这个方法的处理,看下 mark方法
1 | exports.mark = function(genFun) { |
主要就是为了构造原型链,GeneratorFunctionPrototype以及 Gp又是什么呢?
1 | function Generator() {} |
还是构建原型链,最终如下: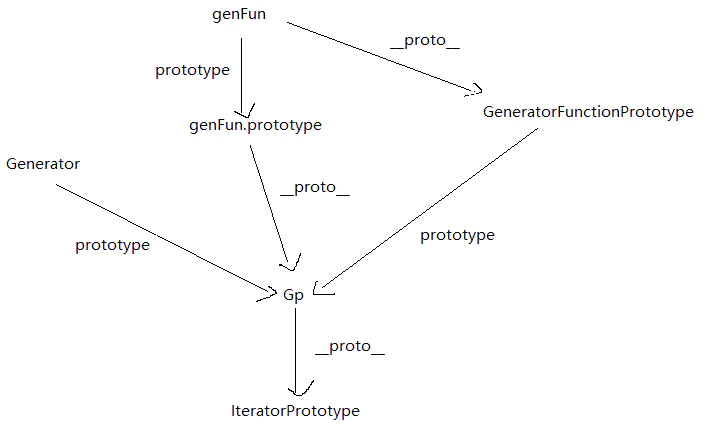
所以,回到上面的 wrap方法,protoGenerator就是 outerFn,也就是_callee,generator 的原型链指向 protoGenerator.prototype
这里有个 context实例,由 Context构造而来在:
1 | function Context(tryLocsList) { |
主要看下 reset方法:1
2
3
4
5
6
7
8
9
10
11
12
13
14
15
16//...
Context.prototype = {
constructor: Context,
reset: function(skipTempReset) {
this.prev = 0;
this.next = 0;
// Resetting context._sent for legacy support of Babel's// function.sent implementation.this.sent = this._sent = undefined;
this.done = false;
this.delegate = null;
this.method = "next";
this.arg = undefined;
//...
},
//...
}
很明显,reset方法的作用就和其属性名一样,是为了初始化一些属性,主要的属性有 this.prev、this.next,用于交替记录当前执行到哪些代码块了,this.done,用于标识当前代码块是否执行完毕,先不细说,后面会提到
然后 generator上挂载了一个 _invoke方法1
2
3// The ._invoke method unifies the implementations of the .next,
// .throw, and .return methods.
generator._invoke = makeInvokeMethod(innerFn, self, context);
看下 makeInvokeMethod的代码:
1 | function makeInvokeMethod(innerFn, self, context) { |
粗略来看,此方法又返回了一个方法,至于方法体里是什么,暂时先不管,继续往下看
_regenerator.default.mark(function _callee() {//...})作为 _asyncToGenerator2.default方法的参数执行,所以继续看 _asyncToGenerator2:
1 | function _asyncToGenerator(fn) { |
_asyncToGenerator同样返回了一个函数,这个函数内部又返回了一个 Promise,这对应着 async函数也是返回一个 promise, 通过_next调用 asyncGeneratorStep:
1 | function asyncGeneratorStep(gen, resolve, reject, _next, _throw, key, arg) { |
参数 gen其实就是上面提到过的 generator,正常情况下,key是 "next", gen[key](arg); 相当于 generator.next(arg), generator上哪来的 next属性呢?其实是通过原型链找到 Gp,在Gp上就存在 next这个属性:
1 | // Helper for defining the .next, .throw, and .return methods of the |
这个的 this._invoke(method, arg);,其实就是 generator._invoke("next", arg)
所以,现在再来看一下 makeInvokeMethod方法返回的 invoke方法,按照正常逻辑会走这一段代码:
1 | function tryCatch(fn, obj, arg) { |
执行 tryCatch方法,返回了一个存在两个属性 value、done的对象,其中 tryCatch的第一个参数 fn,就是包含 while(1)代码段的 _callee$方法,这样,整个流程就串起来了
流程解析
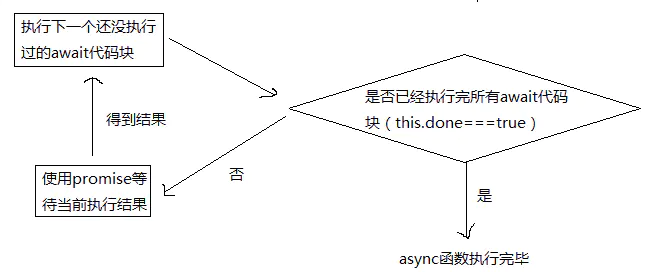
在 while(1)的循环体中,_context参数就是 Context的实例,上面提到过,_context上的 prev和 next属性都被初始化为 0,所以会进入 case 0这个代码块,执行第一块 await代码块,得到info结果,判断 info.done的值
1 | if (info.done) { |
保证原async函数中所有 await代码体全部执行完毕的逻辑就在此处
如果 info.done不为 true,说明 原async函数中await代码体还没有全部执行完毕,进入 else语句,利用 Promise.resolve来等待当前的 await代码块的 promise状态改变,然后调用 then方法,通过执行 _next方法来调用 asyncGeneratorStep,继续执行 _callee$,再次走 switch代码段,根据更新后的 _context_prev来指示进入下一个 case,以此循环,当所有的 await代码段执行完毕后,会进入 case 'end',执行 _context.stop();这个东西
1 | Context.prototype = { |
stop方法中,主要就是设置 this.done为 true,标识当前异步代码段已经执行完毕,当下次再执行 asyncGeneratorStep的时候,进入:1
2
3if (info.done) {
resolve(value);
}
不再继续调用 _next,流程结束
其实当时面试的时候,面试官问我 async/await的实现原理,我第一反应就是 Promise,但紧接着我又想到 Promise属于 ES6,polyfill这个东西最起码也得是 ES5啊,所以我又放弃了这个想法,万万没想到,还可以双层 polyfill
简易版实现
通过上述分析可知,Babel对于 async/await的 polyfill其实主要就是 Promise + 自调用函数,当然,前提是需要通过字符串解析器,将 async函数的按照 await为分割点进行切分,这个字符串解析器涉及到的东西比较多,比如词法分析、语法分析啦,一般都会借助 @babel/parser/@babel/generator/@babel/traverse 系列,但这不是本文的重点,所以就不展开了
假设已经实现了一个解析器,能够将传入的 async函数按照要求分割成几部分
比如,对于以下源码:
1 | // wait() 是一个返回 promise 的函数 |
将被转化为:
1 | function test1 () { |
当然,这只是简易实现,很多东西都没有考虑到,比如 await返回值啊,函数返回值啊等,只是为了体现其原理
for 循环?
当时面试的时候,当我滔滔不绝地说完了 异步函数队列化执行的模式 这个概念后,面试官可能没想到我居然在明知道自己是在猜的情况还能心态这么好地说了那么多,沉默了片刻后,似乎是想打压一下我嚣张的气焰,又问,如果是 for循环呢,怎么处理?
类似于以下代码:
1 | async function fn1 () { |
当时我其实已经知道猜错了,但既然猜了那就猜到底,自己装的逼无论如何也要圆回来啊,于是继续用这个概念强行解释了一通
实际上当时我对于 for循环的这个处理,思路上是对的,就是将 for循环拆解,拿到 单次表达式;条件表达式;末尾循环体 这个三个表达式,然后不断改变 条件表达式,直到触发末尾循环体,babel的处理结果如下:
1 | // 只看主体代码 |
这就揭示了 async/await函数的一个特性,那就是它具备暂停 for循环的能力,即对 for循环有效
Generator?
既然看完了 async/await的实现,那么顺便看下 Generator
对于下述代码:1
2
3
4
5
6
7function* generatorFn() {
console.log(111)
yield wait(500)
console.log(222)
yield wait(1000)
console.log(333)
}
Babel将其转化为:
1 | ; |
这套路跟 async/await一样啊,也是把原代码进行切分,只不过Generator是按照 yield关键字切分的,最主要的区别是,转化后的代码相对于 async/await的来说,少了 _asyncToGenerator2这个方法的调用,而这个方法其实是为了自调用执行使用的,这同时也是 async/await 和 Generator的区别所在
async函数中,只要await后面的表达式返回的值是一个非Promise或者fulfilled态的 Promise,那么async函数就会自动继续往下执行,这在 polyfill中的表现就是一个自调用方法
至于 Generator函数想要在遇到 yield之后继续执行,就必须要在外部手动调用 next方法,而调用的这个next,实际上在 async/await的 polyfill中就是由 _asyncToGenerator2来自动调用的
除此之外,因为是手动调用,如果你不额外增加对异步 promise的处理,那么 Generator本身是不会等待 promise状态变化的,之所以说 async/await是 Generator 函数的语法糖,部分原因就在于 async/await相比于 Generator来说,已经内置了对异步 promise的处理.