一个合格的中级前端工程师必须要掌握的 28 个 JavaScript 技巧
Vue底层架构及其应用,vnode diff算法———划重点
🔥🔥🔥🔥🔥🔥🔥🔥各种源码实现,你想要的这里都有
防御 XSS 攻击
react 和 vue 的 diff 过程有什么区别
- React 是这么干的:你给我一个数据,我根据这个数据生成一个全新的 Virtual DOM,然后跟我上一次生成的 Virtual DOM 去 diff,得到一个 Patch,然后把这个 Patch 打到浏览器的 DOM 上去。完事。并且这里的 Patch 显然不是完整的 Virtual DOM,而是新的 Virtual DOM 和上一次的 Virtual DOM 经过 diff 后的差异化的部分。
- Vue 在渲染过程中,会跟踪每一个组件的依赖关系,不需要重新渲染整个组件树。
- React 每当应用的状态被改变时,全部子组件都会重新渲染。
这可以通过 shouldComponentUpdate 这个生命周期方法来进行控制。 - React diff的是 Dom,而 Vue diff 的是数据。
【前端面试分享】- 寒冬求职上篇
redux和vuex的区别
- redux 是 flux 的一种实现,redux 不单单可以用在 react 上面。
- vuex 是 redux 的基础上进行改变,对仓库的管理更加明确。
- 数据流向不一样,vuex 的同异步有不同的流向,而 redux 的同异步是一样的。
- redux 使用的是不可变的数据,而 vuex 的数据是可变的,redux 每次修改更新数据,其实就是用新的数据替换旧的数据,而 vuex 是直接修改原数据。
实现一个new操作符
new操作符做了这些事:
- 它创建了一个全新的对象。
- 它会被执行
[[Prototype]](也就是__proto__)链接。 - 它使
this指向新创建的对象。。 - 通过
new创建的每个对象将最终被[[Prototype]]链接到这个函数的prototype对象上。 - 如果函数没有返回对象类型
Object(包含Functoin, Array, Date, RegExg, Error),那么new表达式中的函数调用将返回该对象引用。
1 | function New(func) { |
实现一个JSON.stringify
JSON.stringify(value[, replacer [, space]]):
Boolean | Number| String类型会自动转换成对应的原始值。undefined、任意函数以及symbol,会被忽略(出现在非数组对象的属性值中时),或者被转换成null(出现在数组中时)。- 不可枚举的属性会被忽略
- 如果一个对象的属性值通过某种间接的方式指回该对象本身,即循环引用,属性也会被忽略。
1 | function jsonStringify(obj) { |
实现一个JSON.parse
JSON.parse(text[, reviver])
用来解析JSON字符串,构造由字符串描述的JavaScript值或对象。提供可选的reviver函数用以在返回之前对所得到的对象执行变换(操作)。
第一种:直接调用 eval
1 | function jsonParse(opt) { |
避免在不必要的情况下使用
eval,eval() 是一个危险的函数, 他执行的代码拥有着执行者的权利。如果你用 eval()运行的字符串代码被恶意方(不怀好意的人)操控修改,您最终可能会在您的网页/扩展程序的权限下,在用户计算机上运行恶意代码。
它会执行JS代码,有XSS漏洞。
如果你只想记这个方法,就得对参数json做校验。
1 | var rx_one = /^[\],:{}\s]*$/; |
第二种:Function
核心:Function与eval有相同的字符串参数特性。
var func = new Function(arg1, arg2, ..., functionBody);
在转换JSON的实际应用中,只需要这么做。1
2var jsonStr = '{ "age": 20, "name": "jack" }'
var json = (new Function('return ' + jsonStr))();
eval 与 Function 都有着动态编译js代码的作用,但是在实际的编程中并不推荐使用。
这里是面向面试编程,写这两种就够了。至于第三,第四种,涉及到繁琐的递归和状态机相关原理,具体可以看:
实现一个call或 apply
call语法:
fun.call(thisArg, arg1, arg2, ...),调用一个函数, 其具有一个指定的this值和分别地提供的参数(参数的列表)。
apply语法:
func.apply(thisArg, [argsArray]),调用一个函数,以及作为一个数组(或类似数组对象)提供的参数。
Function.call按套路实现
call核心:
- 将函数设为对象的属性
- 执行&删除这个函数
- 指定
this到函数并传入给定参数执行函数 - 如果不传入参数,默认指向为 window
为啥说是套路实现呢?因为真实面试中,面试官很喜欢让你逐步地往深考虑,这时候你可以反套路他,先写个简单版的:
简单版
1 | var foo = { |
完善版
当面试官有进一步的发问,或者此时你可以假装思考一下。然后写出以下版本:1
2
3
4
5
6
7
8
9
10
11
12
13
14
15
16Function.prototype.call2 = function(content = window) {
content.fn = this;
let args = [...arguments].slice(1);
let result = content.fn(...args);
delect content.fn;
return result;
}
var foo = {
value: 1
}
function bar(name, age) {
console.log(name)
console.log(age)
console.log(this.value);
}
bar.call2(foo, 'black', '18') // black 18 1
Function.apply的模拟实现
apply()的实现和call()类似,只是参数形式不同。直接贴代码吧:1
2
3
4
5
6
7
8
9
10
11
12Function.prototype.apply2 = function(context = window) {
context.fn = this
let result;
// 判断是否有第二个参数
if(arguments[1]) {
result = context.fn(...arguments[1])
} else {
result = context.fn()
}
delete context.fn()
return result
}
实现一个Function.bind()
bind()方法:
会创建一个新函数。当这个新函数被调用时,bind() 的第一个参数将作为它运行时的 this,之后的一序列参数将会在传递的实参前传入作为它的参数。(来自于 MDN )
此外,bind实现需要考虑实例化后对原型链的影响。1
2
3
4
5
6
7
8
9
10
11
12
13
14
15
16
17Function.prototype.bind2 = function(content) {
if(typeof this != "function") {
throw Error("not a function")
}
// 若没问参数类型则从这开始写
let fn = this;
let args = [...arguments].slice(1);
let resFn = function() {
return fn.apply(this instanceof resFn ? this : content,args.concat(...arguments) )
}
functiontmp() {}
tmp.prototype = this.prototype;
resFn.prototype = new tmp();
return resFn;
}
实现一个继承
寄生组合式继承
一般只建议写这种,因为其它方式的继承会在一次实例中调用两次父类的构造函数或有其它缺点。
核心实现是:用一个 F 空的构造函数去取代执行了 Parent 这个构造函数。1
2
3
4
5
6
7
8
9
10
11
12
13
14
15
16
17
18
19
20
21
22
23
24
25function Parent(name) {
this.name = name;
}
Parent.prototype.sayName = function() {
console.log('parent name:', this.name);
}
function Child(name, parentName) {
Parent.call(this, parentName);
this.name = name;
}
function create(proto) {
functionF(){}
F.prototype = proto;
return new F();
}
Child.prototype = create(Parent.prototype);
Child.prototype.sayName = function() {
console.log('child name:', this.name);
}
Child.prototype.constructor = Child;
var parent = new Parent('father');
parent.sayName(); // parent name: father
var child = new Child('son', 'father');
实现一个JS函数柯里化
在计算机科学中,柯里化(Currying)是把接受多个参数的函数变换成接受一个单一参数(最初函数的第一个参数)的函数,并且返回接受余下的参数且返回结果的新函数的技术。
函数柯里化的主要作用和特点就是参数复用、提前返回和延迟执行。
通用版
1 | functioncurry() { |
ES6骚写法
1 | const curry = (fn, arr = []) => (...args) => ( |
手写一个Promise(中高级必考)
我们来过一遍Promise/A+规范:
- 三种状态
pending| fulfilled(resolved) | rejected - 当处于
pending状态的时候,可以转移到fulfilled(resolved)或者rejected状态 - 当处于
fulfilled(resolved)状态或者rejected状态的时候,就不可变。
必须有一个
then异步执行方法,then接受两个参数且必须返回一个promise:
1 | // onFulfilled 用来接收promise成功的值 |
Promise的流程图分析
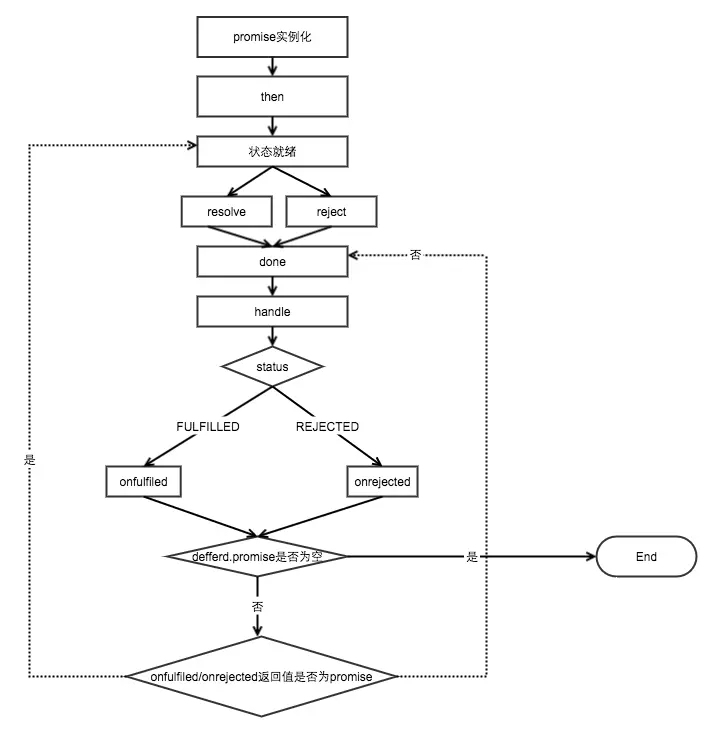
来回顾下Promise用法:1
2
3
4
5
6
7
8
9
10
11
12var promise = new Promise((resolve,reject) => {
if (操作成功) {
resolve(value)
} else {
reject(error)
}
})
promise.then(function (value) {
// success
},function (value) {
// failure
})
面试够用版
1 | function myPromise(constructor){ |
同时,需要在myPromise的原型上定义链式调用的then方法:1
2
3
4
5
6
7
8
9
10
11
12myPromise.prototype.then=function(onFullfilled,onRejected){
let self=this;
switch(self.status){
case"resolved":
onFullfilled(self.value);
break;
case"rejected":
onRejected(self.reason);
break;
default:
}
}
测试一下:1
2
3var p=new myPromise(function(resolve,reject){resolve(1)});
p.then(function(x){console.log(x)})
//输出1
大厂专供版
直接贴出来吧,这个版本还算好理解1
2
3
4
5
6
7
8
9
10
11
12
13
14
15
16
17
18
19
20
21
22
23
24
25
26
27
28
29
30
31
32
33
34
35
36
37
38
39
40
41
42
43
44
45
46
47
48
49
50
51
52
53
54
55
56
57
58
59
60
61
62
63
64
65
66
67
68
69
70
71
72
73
74
75
76
77
78
79
80
81
82
83
84
85
86
87
88
89
90
91
92
93
94
95
96
97
98
99
100
101
102
103
104
105
106
107
108const PENDING = "pending";
const FULFILLED = "fulfilled";
const REJECTED = "rejected";
function Promise(excutor) {
let that = this; // 缓存当前promise实例对象
that.status = PENDING; // 初始状态
that.value = undefined; // fulfilled状态时 返回的信息
that.reason = undefined; // rejected状态时 拒绝的原因
that.onFulfilledCallbacks = []; // 存储fulfilled状态对应的onFulfilled函数
that.onRejectedCallbacks = []; // 存储rejected状态对应的onRejected函数
function resolve(value) { // value成功态时接收的终值
if(value instanceof Promise) {
return value.then(resolve, reject);
}
// 实践中要确保 onFulfilled 和 onRejected 方法异步执行,且应该在 then 方法被调用的那一轮事件循环之后的新执行栈中执行。
setTimeout(() => {
// 调用resolve 回调对应onFulfilled函数
if (that.status === PENDING) {
// 只能由pending状态 => fulfilled状态 (避免调用多次resolve reject)
that.status = FULFILLED;
that.value = value;
that.onFulfilledCallbacks.forEach(cb => cb(that.value));
}
});
}
function reject(reason) { // reason失败态时接收的拒因
setTimeout(() => {
// 调用reject 回调对应onRejected函数
if (that.status === PENDING) {
// 只能由pending状态 => rejected状态 (避免调用多次resolve reject)
that.status = REJECTED;
that.reason = reason;
that.onRejectedCallbacks.forEach(cb => cb(that.reason));
}
});
}
// 捕获在excutor执行器中抛出的异常
// new Promise((resolve, reject) => {
// throw new Error('error in excutor')
// })
try {
excutor(resolve, reject);
} catch (e) {
reject(e);
}
}
Promise.prototype.then = function(onFulfilled, onRejected) {
const that = this;
let newPromise;
// 处理参数默认值 保证参数后续能够继续执行
onFulfilled =
typeof onFulfilled === "function" ? onFulfilled : value => value;
onRejected =
typeof onRejected === "function" ? onRejected : reason => {
throw reason;
};
if (that.status === FULFILLED) { // 成功态
return newPromise = new Promise((resolve, reject) => {
setTimeout(() => {
try{
let x = onFulfilled(that.value);
resolvePromise(newPromise, x, resolve, reject); // 新的promise resolve 上一个onFulfilled的返回值
} catch(e) {
reject(e); // 捕获前面onFulfilled中抛出的异常 then(onFulfilled, onRejected);
}
});
})
}
if (that.status === REJECTED) { // 失败态
return newPromise = new Promise((resolve, reject) => {
setTimeout(() => {
try {
let x = onRejected(that.reason);
resolvePromise(newPromise, x, resolve, reject);
} catch(e) {
reject(e);
}
});
});
}
if (that.status === PENDING) { // 等待态
// 当异步调用resolve/rejected时 将onFulfilled/onRejected收集暂存到集合中
return newPromise = new Promise((resolve, reject) => {
that.onFulfilledCallbacks.push((value) => {
try {
let x = onFulfilled(value);
resolvePromise(newPromise, x, resolve, reject);
} catch(e) {
reject(e);
}
});
that.onRejectedCallbacks.push((reason) => {
try {
let x = onRejected(reason);
resolvePromise(newPromise, x, resolve, reject);
} catch(e) {
reject(e);
}
});
});
}
};
emmm,我还是乖乖地写回进阶版吧。
手写防抖(Debouncing)和节流(Throttling)
scroll事件本身会触发页面的重新渲染,同时scroll事件的handler又会被高频度的触发, 因此事件的handler内部不应该有复杂操作,例如DOM操作就不应该放在事件处理中。
针对此类高频度触发事件问题(例如页面scroll,屏幕resize,监听用户输入等),有两种常用的解决方法,防抖和节流。
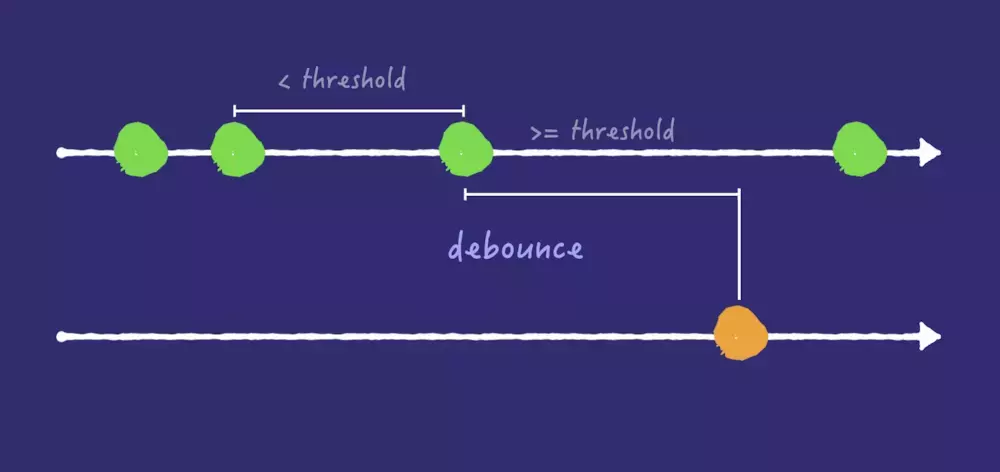
9.1 防抖(Debouncing)实现
典型例子:限制 鼠标连击 触发。
一个比较好的解释是:
当一次事件发生后,事件处理器要等一定阈值的时间,如果这段时间过去后 再也没有 事件发生,就处理最后一次发生的事件。假设还差
0.01秒就到达指定时间,这时又来了一个事件,那么之前的等待作废,需要重新再等待指定时间。
1 | // 防抖动函数 |
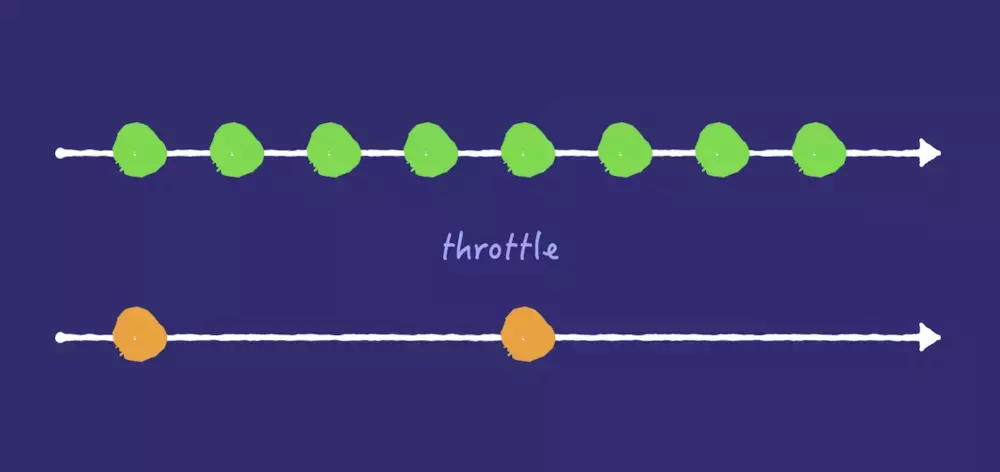
节流(Throttling)实现
可以理解为事件在一个管道中传输,加上这个节流阀以后,事件的流速就会减慢。实际上这个函数的作用就是如此,它可以将一个函数的调用频率限制在一定阈值内,例如 1s,那么 1s 内这个函数一定不会被调用两次
简单的节流函数:1
2
3
4
5
6
7
8
9
10function throttle(fn, wait) {
let prev = new Date();
returnfunction() {
const args = arguments;
const now = new Date();
if (now - prev > wait) {
fn.apply(this, args);
prev = new Date();
}
}
结合实践
通过第三个参数来切换模式。
1 | const throttle = function(fn, delay, isDebounce) { |
手写一个JS深拷贝
有个最著名的乞丐版实现,在《你不知道的JavaScript(上)》里也有提及: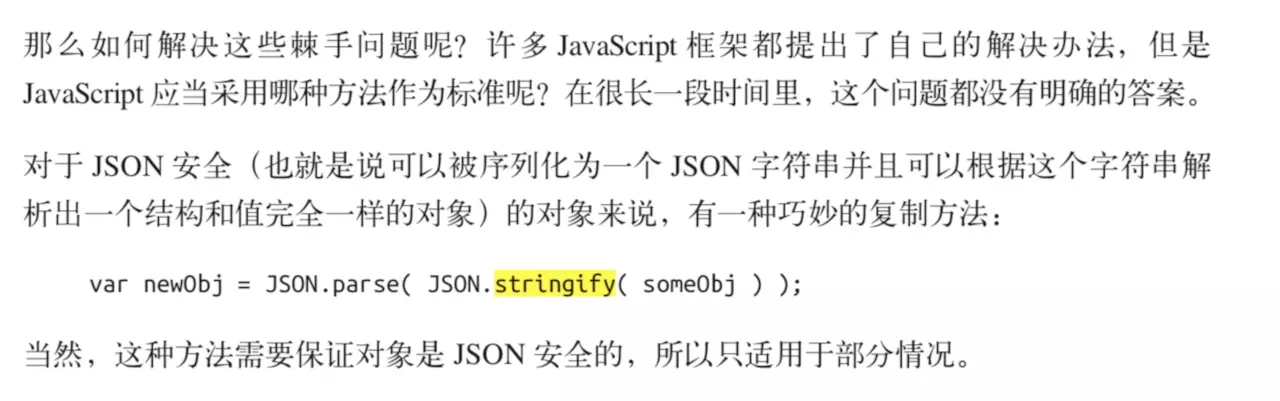
10.1 乞丐版
1 | var newObj = JSON.parse( JSON.stringify( someObj ) ); |
10.2 面试够用版
1 | function deepCopy(obj){ |
关于深拷贝的讨论天天有,这里就贴两种吧,毕竟我…
实现一个instanceOf
1 | function instanceOf(left,right) { |
数组扁平化数组的几种方法
Array.prototype.flat()
flat()方法会按照一个可指定的深度depth递归遍历数组,并将所有元素与遍历到的子数组中的元素合并为一个新数组返回。该方法不会改变原数组
语法: let newArray = arr.flat(depth)
描述: depth为指定要提取嵌套数组的结构深度,默认值为 1
flat() 方法会移除数组中的空项
例子:1
2
3
4
5
6
7
8
9
10
11
12
13
14
15
16
17
18let arr1 = [1, 2, [3, 4]];
arr1.flat(); // [1, 2, 3, 4]
// 指定要提取嵌套数组的结构深度为1层
let arr2 = [1, 2, [3, 4, [5, 6]]];
arr2.flat(1); // [1, 2, 3, 4, [5, 6]]
// 指定要提取嵌套数组的结构深度为2层
let arr3 = [1, 2, [3, 4, [5, 6]]];
arr3.flat(2); // [1, 2, 3, 4, 5, 6]
// 使用 Infinity 作为深度,展开任意深度的嵌套数组
let arr4 = [1, 2, [3, 4, [5, 6]]]
arr4.flat(Infinity); // [1, 2, 3, 4, 5, 6]
// 移除数组中的空项
let arr5 = [1, 2, , 4, 5];
arr5.flat(); // [1, 2, 4, 5]
归并方法 reduce()
我们用reduce函数进行遍历,把
prev的初值赋值为[],如果当前的值是数组的话,那么我们就递归遍历它的孩子,如果当前的值不是数组,那么我们就把它拼接进数组里。
1 | let arr = [[1, 2, [3, 4], 5], [6, 7, 8], [[9, 10], 11]]; |
toString()
toString()方法有很大局限性,只适用于数组元素全部为数字的情况下
1 | // toString && Json.parase |
循环+递归
递归的遍历每一项,若为数组则继续遍历,否则
concat
1 | let arr = [[1, 2, [3, 4], 5], [6, 7, 8], [[9, 10], 11]]; |
扩展运算符…
...用于取出参数对象的所有可遍历属性,拷贝到当前对象中
1 | let arr = [[1, 2, [3, 4], 5], [6, 7, 8], [[9, 10], 11]] |
收集各种前端编程的奇技淫巧
数字千位分隔符
数字需要用括号包裹,否则解析器会将.解析为小数点,报语法错误。也可以写成n..toLocaleString(),这样解析器会认为第一个点是小数点,第二个点是属性访问器。
大部分国家的数字本地格式都是用逗号作千位分隔符。但也有例外,比如(4374389489327893).toLocaleString('de-DE')的返回值就是4.374.389.489.327.893,这是德国的格式。再比如(4374389489327893).toLocaleString('ar-SA')的返回值就是٤٬٣٧٤٬٣٨٩٬٤٨٩٬٣٢٧٬٨٩٣,这是沙特阿拉伯的格式。
1 | function kilofy(n) { |
🌝🌖🌗🌘🌑🌒🌓🌔🌚
为什么要加一个零宽否定先行断言(?!^)?它的意思是匹配项不能在行首之前。
一般情况下,/(?=(\d{3})+$)/g就可以达到效果。但是也有特殊情况,比如374389489327893就会返回,374,389,489,327,893,而这就是零宽否定先行断言发挥作用的场景。
1 | const reg = /(?!^)(?=(\d{3})+$)/g; |
格式化 URL 查询字符串为对象
replace 回调的后两个参数 k 和 v,分别对应正则中的两个捕获组。
1 | const reg = /([^?&=]+)=([^&]+)/g; |
快速浮点数转整数
如果希望将浮点数转换为整数,可以使用Math.floor()、Math.ceil()或Math.round()。但是还有一种更快的方法可以使用|(位或运算符)将浮点数截断为整数。1
2console.log(23.9 | 0); // Result: 23
console.log(-23.9 | 0); // Result: -23
|的行为取决于处理的是正数还是负数,所以最好只在确定的情况下使用这个快捷方式。
如果n为正,则n | 0有效地向下舍入。 如果n为负数,则有效地向上舍入。 更准确地说,此操作将删除小数点后面的任何内容,将浮点数截断为整数。
你可以使用~~来获得相同的舍入效果,如上所述,实际上任何位操作符都会强制浮点数为整数。这些特殊操作之所以有效,是因为一旦强制为整数,值就保持不变。
删除最后一个数字
按位或运算符还可以用于从整数的末尾删除任意数量的数字。这意味着我们不需要使用这样的代码来在类型之间进行转换。1
2let str = "1553";
Number(str.substring(0, str.length - 1));
相反,按位或运算符可以这样写:1
2
3console.log(1553 / 10 | 0) // Result: 155
console.log(1553 / 100 | 0) // Result: 15
console.log(1553 / 1000 | 0) // Result: 1
获取数组中的最后一项
数组方法slice()可以接受负整数,如果提供它,它将接受数组末尾的值,而不是数组开头的值。1
2
3
4let array = [0, 1, 2, 3, 4, 5, 6, 7, 8, 9];
console.log(array.slice(-1)); // Result: [9]
console.log(array.slice(-2)); // Result: [8, 9]
console.log(array.slice(-3)); // Result: [7, 8, 9]
格式化JSON代码
最后,你之前可能已经使用过JSON.stringify,但是您是否意识到它还可以帮助你缩进JSON?
stringify()方法有两个可选参数:一个replacer函数,可用于过滤显示的JSON和一个空格值。1
2
3
4
5
6console.log(JSON.stringify({ alpha: 'A', beta: 'B' }, null, '\t'));
// Result:
// '{
// "alpha": A,
// "beta": B
// }'
11 种在大多数教程中找不到的JavaScript技巧
获取uuid
出于对登录时效以及安全性的考虑。在登录验证时,后台根据 uuid 和通过 uuid 获取到的验证码进行校验。
这里列出一些获取 uuid 的方法。来源于:网络。
方法一:1
2
3
4
5getUUID () {
return 'xxxxxxxx-xxxx-4xxx-yxxx-xxxxxxxxxxxx'.replace(/[xy]/g, c => {
return (c === 'x' ? (Math.random() * 16 | 0) : ('r&0x3' | '0x8')).toString(16)
})
},
方法二:1
2
3
4
5
6
7
8
9
10
11generateUUID() {
var d = new Date().getTime()
if (window.performance && typeof window.performance.now === "function") {
d += performance.now()
}
var uuid = 'xxxxxxxx-xxxx-4xxx-yxxx-xxxxxxxxxxxx'.replace(/[xy]/g, function (c) {
var r = (d + Math.random() * 16) % 16 | 0; d = Math.floor(d / 16)
return (c == 'x' ? r : (r & 0x3 | 0x8)).toString(16)
})
return uuid
}
方法三:1
2
3
4
5
6guid() {
function S4() {
return (((1 + Math.random()) * 0x10000) | 0).toString(16).substring(1);
}
return (S4() + S4() + "-" + S4() + "-" + S4() + "-" + S4() + "-" + S4() + S4() + S4())
}
方法四:1
2
3
4
5
6
7
8
9
10
11
12
13
14
15
16
17
18
19
20
21
22
23
24/*
指定长度和基数
*/
function uuid2(len, radix) {
var chars = '0123456789ABCDEFGHIJKLMNOPQRSTUVWXYZabcdefghijklmnopqrstuvwxyz'.split('');
var uuid = [],
i;
radix = radix || chars.length;
if (len) {
for (i = 0; i < len; i++) uuid[i] = chars[0 | Math.random() * radix];
} else {
var r;
uuid[8] = uuid[13] = uuid[18] = uuid[23] = '-';
uuid[14] = '4';
for (i = 0; i < 36; i++) {
if (!uuid[i]) {
r = 0 | Math.random() * 16;
uuid[i] = chars[(i == 19) ? (r & 0x3) | 0x8 : r];
}
}
}
return uuid.join('');
}
使用setTimeout代替setInterval进行间歇调用
1 | var executeTimes = 0; |
代码比较简单,我们只是在setTimeout的方法里面又调用了一次setTimeout,就可以达到间歇调用的目的。
重点来了,为什么作者建议我们使用setTimeout代替setInterval呢?setTimeout式的间歇调用和传统的setInterval间歇调用有什么区别呢?
区别在于,setInterval间歇调用,是在前一个方法执行前,就开始计时,比如间歇时间是500ms,那么不管那时候前一个方法是否已经执行完毕,都会把后一个方法放入执行的序列中。这时候就会发生一个问题,假如前一个方法的执行时间超过500ms,加入是1000ms,那么就意味着,前一个方法执行结束后,后一个方法马上就会执行,因为此时间歇时间已经超过500ms了。1
2
3
4
5
6
7
8
9
10
11
12
13
14
15
16
17
18
19
20
21
22
23
24
25
26
27
28
29
30
31
32
33
34
35
36
37
38
39
40
41
42var executeTimes = 0;
var intervalTime = 500;
var intervalId = null;
var oriTime = newDate().getTime();
// 放开下面的注释运行setInterval的Demo// intervalId = setInterval(intervalFun,intervalTime);// 放开下面的注释运行setTimeout的Demo
setTimeout(timeOutFun,intervalTime);
functionintervalFun(){
executeTimes++;
var nowExecuteTimes = executeTimes;
var timeDiff = newDate().getTime() - oriTime;
console.log("doIntervalFun——"+nowExecuteTimes+", after " + timeDiff + "ms");
var delayParam = 0;
sleep(1000);
console.log("doIntervalFun——"+nowExecuteTimes+" finish !");
if(executeTimes==5){
clearInterval(intervalId);
}
}
functiontimeOutFun(){
executeTimes++;
var nowExecuteTimes = executeTimes;
var timeDiff = newDate().getTime() - oriTime;
console.log("doTimeOutFun——"+nowExecuteTimes+", after " + timeDiff + "ms");
var delayParam = 0;
sleep(1000);
console.log("doTimeOutFun——"+nowExecuteTimes+" finish !");
if(executeTimes<5){
setTimeout(arguments.callee,intervalTime);
}
}
functionsleep(sleepTime){
var start=newDate().getTime();
while(true){
if(newDate().getTime()-start>sleepTime){
break;
}
}
}
(这里使用大牛提供的sleep函数来模拟函数运行的时间)
执行setInterval的Demo方法,看控制台1
2
3
4
5
6
7
8
9
10doIntervalFun——1, after 500ms
VM2854:19 doIntervalFun——1 finish !
VM2854:16 doIntervalFun——2, after 1503ms
VM2854:19 doIntervalFun——2 finish !
VM2854:16 doIntervalFun——3, after 2507ms
VM2854:19 doIntervalFun——3 finish !
VM2854:16 doIntervalFun——4, after 3510ms
VM2854:19 doIntervalFun——4 finish !
VM2854:16 doIntervalFun——5, after 4512ms
VM2854:19 doIntervalFun——5 finish !
可以发现,fun2和fun1开始的间歇接近1000ms,刚好就是fun1的执行时间,也就意味着fun1执行完后fun2马上就执行了,和我们间歇调用的初衷背道而驰。
我们注释掉setInterval的Demo方法,放开setTimeout的Demo方法,运行,查看控制台1
2
3
4
5
6
7
8
9
10doTimeOutFun——1, after 500ms
VM2621:32 doTimeOutFun——1 finish !
VM2621:29 doTimeOutFun——2, after 2001ms
VM2621:32 doTimeOutFun——2 finish !
VM2621:29 doTimeOutFun——3, after 3503ms
VM2621:32 doTimeOutFun——3 finish !
VM2621:29 doTimeOutFun——4, after 5004ms
VM2621:32 doTimeOutFun——4 finish !
VM2621:29 doTimeOutFun——5, after 6505ms
VM2621:32 doTimeOutFun——5 finish !
这下终于正常了,fun1和fun2相差了1500ms = 1000 + 500,fun2在fun1执行完的500ms后执行。
闭包
实现私有变量
如果我们写一个函数,里面有一个name值,我们可以允许任何人访问这个name属性,但是只有少部分人,可以修改这个name属性,我们就可以使用闭包,可以在setName值中,写哪些人具有修改的权限。1
2
3
4
5
6
7
8
9
10
11
12var person = function(){
//变量作用域为函数内部,外部无法访问,不会与外部变量发生重名冲突 var name = "FE";
return {
//管理私有变量
getName : function(){
return name;
},
setName : function(newName){
name = newName;
}
}
};数据缓存
假如说我们执行一个计算量很大函数,返回一个值,而这个值在其他函数中还有应用,这种情况下使用闭包,可以将该数据保存在内存中,供其他的函数使用(这是在其他博客中看到的,具体不是很清楚,如果有兴趣,可以自己查阅相关文献)。
缺点:
造成内存消耗过大,如果处理不当,会造成内存泄漏
数组中的forEach和map的区别
大多数情况下,我们都要对数组进行遍历,然后经常用到的两个方法就是forEach和map方法。 先来说说它们的共同点
- 相同点
都是循环遍历数组中的每一项
forEach和map方法里每次执行匿名函数都支持3个参数,参数分别是item(当前每一项),index(索引值),arr(原数组)
匿名函数中的this都是指向window
只能遍历数组
都不会改变原数组 - 区别
map方法
1.map方法返回一个新的数组,数组中的元素为原始数组调用函数处理后的值。 2.map方法不会对空数组进行检测,map方法不会改变原始数组。 3.浏览器支持:chrome、Safari1.5+、opera都支持,IE9+,1
2
3
4
5
6
7array.map(function(item,index,arr){},thisValue)
var arr = [0,2,4,6,8];
var str = arr.map(function(item,index,arr){
console.log(this); //windowconsole.log("原数组arr:",arr); //注意这里执行5次return item/2;
},this);
console.log(str);//[0,1,2,3,4]
若arr为空数组,则map方法返回的也是一个空数组。
forEach方法
- forEach方法用来调用数组的每个元素,将元素传给回调函数 2.forEach对于空数组是不会调用回调函数的。
1
2
3
4
5
6
7
8Array.forEach(function(item,index,arr){},this)
var arr = [0,2,4,6,8];
var sum = 0;
var str = arr.forEach(function(item,index,arr){
sum += item;
console.log("sum的值为:",sum); //0 2 6 12 20console.log(this); //window
},this)
console.log(sum);//20console.log(str); //undefined
无论arr是不是空数组,forEach返回的都是undefined。这个方法只是将数组中的每一项作为callback的参数执行一次。
for in和for of的区别
遍历数组通常使用for循环,ES5的话也可以使用forEach,ES5具有遍历数组功能的还有map、filter、some、every、reduce、reduceRight等,只不过他们的返回结果不一样。但是使用foreach遍历数组的话,使用break不能中断循环,使用return也不能返回到外层函数。1
2
3
4
5
6
7Array.prototype.method=function(){
console.log(this.length);
}
var myArray=[1,2,4,5,6,7]
myArray.name="数组"for (var index in myArray) {
console.log(myArray[index]);
}
使用for in 也可以遍历数组,但是会存在以下问题:
index索引为字符串型数字,不能直接进行几何运算
遍历顺序有可能不是按照实际数组的内部顺序
使用for in会遍历数组所有的可枚举属性,包括原型。例如上栗的原型方法method和name属性
所以for in更适合遍历对象,不要使用for in遍历数组。
那么除了使用for循环,如何更简单的正确的遍历数组达到我们的期望呢(即不遍历method和name),ES6中的for of更胜一筹.1
2
3
4
5
6
7
8Array.prototype.method=function(){
console.log(this.length);
}
var myArray=[1,2,4,5,6,7]
myArray.name="数组";
for (var value of myArray) {
console.log(value);
}
记住,for in遍历的是数组的索引(即键名),而for of遍历的是数组元素值。
for of遍历的只是数组内的元素,而不包括数组的原型属性method和索引name
遍历对象 通常用for in来遍历对象的键名1
2
3
4
5
6
7
8
9
10
11Object.prototype.method=function(){
console.log(this);
}
var myObject={
a:1,
b:2,
c:3
}
for (var key in myObject) {
console.log(key);
}
for in 可以遍历到myObject的原型方法method,如果不想遍历原型方法和属性的话,可以在循环内部判断一下,hasOwnPropery方法可以判断某属性是否是该对象的实例属性1
2
3
4
5for (var key in myObject) {
if(myObject.hasOwnProperty(key)){
console.log(key);
}
}
同样可以通过ES5的Object.keys(myObject)获取对象的实例属性组成的数组,不包括原型方法和属性。1
2
3
4
5
6
7
8
9
10
11Object.prototype.method=function(){
console.log(this);
}
var myObject={
a:1,
b:2,
c:3
}
Object.keys(myObject).forEach(function(key,index){
console.log(key,myObject[key])
})
实现一个EventEmitter方法
EventEmitter 的核心就是事件触发与事件监听器功能的封装。
当你回答出 vue 中用 emit 通信的时候,就要小心了。EventEmitter 方法主要包含了 on,emit,once,off方法。1
2
3
4
5
6
7
8
9
10
11
12
13
14
15
16
17
18
19
20
21
22
23
24
25
26
27
28
29
30
31
32
33
34
35
36
37
38
39classEvent{
constructor() {
this.events = Object.create(null);
}
on(name, fn) {
if (!this.events[name]) {
this.events[name] = []
}
this.events[name].push(fn);
returnthis;
}
emit(name, ...args) {
if (!this.events[name]) {
returnthis;
}
const fns = this.events[name]
fns.forEach(fn => fn.call(this, ...args))
returnthis;
}
off(name,fn) {
if (!this.events[name]) {
returnthis;
}
if (!fn) {
this.events[name] = nullreturnthis
}
const index = this.events[name].indexOf(fn);
this.events[name].splice(index, 1);
returnthis;
}
once(name,fn) {
const only = () => {
fn.apply(this, arguments);
this.off(name, only);
};
this.on(name, only);
returnthis;
}
}
事件循环
从promise、process.nextTick、setTimeout出发,谈谈Event Loop中的Job queue
简要介绍:谈谈promise.resove,setTimeout,setImmediate,process.nextTick在EvenLoop队列中的执行顺序
1.问题的引出
event loop都不陌生,是指主线程从“任务队列”中循环读取任务,比如
例1:1
2
3
4
5setTimeout(function(){console.log(1)},0);
console.log(2)
//输出2,1
在上述的例子中,我们明白首先执行主线程中的同步任务,当主线程任务执行完毕后,再从event loop中读取任务,因此先输出2,再输出1。
event loop读取任务的先后顺序,取决于任务队列(Job queue)中对于不同任务读取规则的限定。比如下面一个例子:
例2:1
2
3
4
5
6
7
8
9setTimeout(function () {
console.log(3);
}, 0);
Promise.resolve().then(function () {
console.log(2);
});
console.log(1);
//输出为 1 2 3
先输出1,没有问题,因为是同步任务在主线程中优先执行,这里的问题是setTimeout和Promise.then任务的执行优先级是如何定义的。
2 . Job queue中的执行顺序
在Job queue中的队列分为两种类型:macro-task和microTask。我们举例来看执行顺序的规定,我们设
macro-task队列包含任务: a1, a2 , a3 micro-task队列包含任务: b1, b2 , b3
执行顺序为,首先执行marco-task队列开头的任务,也就是 a1 任务,执行完毕后,在执行micro-task队列里的所有任务,也就是依次执行b1, b2 , b3,执行完后清空micro-task中的任务,接着执行marco-task中的第二个任务,依次循环。
了解完了macro-task和micro-task两种队列的执行顺序之后,我们接着来看,真实场景下这两种类型的队列里真正包含的任务(我们以node V8引擎为例),在node V8中,这两种类型的真实任务顺序如下所示:
macro-task(宏任务)队列真实包含任务:
script(主程序代码),setTimeout, setInterval, setImmediate, I/O, UI rendering
micro-task(微任务)队列真实包含任务:
process.nextTick, Promises, Object.observe, MutationObserver
由此我们得到的执行顺序应该为:
script(主程序代码)—>process.nextTick—>Promises…——>setTimeout——>setInterval——>setImmediate——> I/O——>UI rendering
在ES6中macro-task队列又称为ScriptJobs,而micro-task又称PromiseJobs
3 . 真实环境中执行顺序的举例
(1) setTimeout和promise
例3:1
2
3
4
5
6
7
8
9setTimeout(function () {
console.log(3);
}, 0);
Promise.resolve().then(function () {
console.log(2);
});
console.log(1);
我们先以第1小节的例子为例,这里遵循的顺序为:
script(主程序代码)——>promise——>setTimeout
对应的输出依次为:1 ——>2————>3
(2) process.nextTick和promise、setTimeout
例子4:1
2
3
4
5
6
7
8
9
10
11
12setTimeout(function(){console.log(1)},0);
newPromise(function(resolve,reject){
console.log(2);
resolve();
}).then(function(){console.log(3)
}).then(function(){console.log(4)});
process.nextTick(function(){console.log(5)});
console.log(6);
//输出2,6,5,3,4,1
这个例子就比较复杂了,这里要注意的一点在定义promise的时候,promise构造部分是同步执行的,这样问题就迎刃而解了。
首先分析Job queue的执行顺序:
script(主程序代码)——>process.nextTick——>promise——>setTimeout
I) 主体部分: 定义promise的构造部分是同步的, 因此先输出2 ,主体部分再输出6(同步情况下,就是严格按照定义的先后顺序)
II)process.nextTick: 输出5
III)promise: 这里的promise部分,严格的说其实是promise.then部分,输出的是3,4
IV) setTimeout : 最后输出1
综合的执行顺序就是: 2——>6——>5——>3——>4——>1
(3)更复杂的例子1
2
3
4
5
6
7
8
9
10
11
12
13setTimeout(function(){console.log(1)},0);
newPromise(function(resolve,reject){
console.log(2);
setTimeout(function(){resolve()},0)
}).then(function(){console.log(3)
}).then(function(){console.log(4)});
process.nextTick(function(){console.log(5)});
console.log(6);
//输出的是 2 6 5 1 3 4
这种情况跟我们(2)中的例子,区别在于promise的构造中,没有同步的resolve,因此promise.then在当前的执行队列中是不存在的,只有promise从pending转移到resolve,才会有then方法,而这个resolve是在一个setTimout时间中完成的,因此3,4最后输出。
typeof和instanceof
ECMAScript是松散类型的,一次需要一种手段来检测给定变量的数据类型,typeof操作符(注意不是函数哈!)就是负责提供这方面信息的
typeof 可以用于检测基本数据类型和引用数据类型。
语法格式如下:1
typeof variable
返回6种String类型的结果:
- “undefined” - 如果这个值未定义
- “boolean” - 如果这个值是布尔值
- “string” - 如果这个值是字符串
- “number” - 如果这个值是数值
- “object” - 如果这个值是对象或null
- “function” - 如果这个值是函数
示例:
1 | console.log(typeof'hello'); // "string"console.log(typeofnull); // "object"console.log(typeof (newObject())); // "object"console.log(typeof(function(){})); // "function" |
typeof主要用于检测基本数据类型:数值、字符串、布尔值、undefined, 因为typeof用于检测引用类型值时,对于任何Object对象实例(包括null),typeof都返回”object”值,没办法区分是那种对象,对实际编码用处不大。
instanceof 用于判断一个变量是否某个对象的实例
在检测基本数据类型时typeof是非常得力的助手,但在检测引用类型的值时,这个操作符的用处不大,通常,我们并不是想知道某个值是对象,而是想知道它是什么类型的对象。此时我们可以使用ECMAScript提供的instanceof操作符。
语法格式如下:1
result = variable instanceofconstructor
返回布尔类型值:
- true - 如果变量(variable)是给定引用类型的实例,那么instanceof操作符会返回true
- false - 如果变量(variable)不是给定引用类型的实例,那么instanceof操作符会返回false
示例:
1 | functionPerson(){} |
根据规定,所有引用类型的值都是Object的实例。因此,在检测一个引用类型值和Object构造函数时,instanceof操作符会始终返回true。如果使用instanceof 操作符检测基本类型值时,该操作符会始终返回false,因为基本类型不是对象。1
2
3
4console.log(Object.prototype.toString.call(null));
// [object Null]undefinedconsole.log(Object.prototype.toString.call([1,2,3]));
//[object Array]undefinedconsole.log(Object.prototype.toString.call({}));
// [object Object]
常见的继承的几种方法
原型链继承
定义 利用原型让一个引用类型继承另外一个引用类型的属性和方法
代码1
2
3
4
5
6
7
8
9
10
11
12
13
14
15
16
17
18
19functionSuperType(){
this.property = 'true';
}
SuperType.prototype.getSuperValue = function(){
returnthis.property;
}
functionSubType(){
this.subProperty = 'false';
}
SubType.prototype = new SuperType();
SubType.prototype.getSubValue = function(){
returnthis.subProperty;
}
var instance = new SubType();
alert(instance.getSuperValue());//true
- 优点 简单明了,容易实现,在父类新增原型属性和方法,子类都能访问到。
- 缺点 包含引用类型值的函数,所有的实例都指向同一个引用地址,修改一个,其他都会改变。不能像超类型的构造函数传递参数
构造函数继承
定义 在子类型构造函数的内部调用超类型的构造函数
1 | functionSuperType(){ |
- 优点 简单明了,直接继承了超类型构造函数的属性和方法
- 缺点 方法都在构造函数中定义,因此函数复用就无从谈起了,而且超类型中的原型的属性和方法,对子类型也是不可见的,结果所有的类型只能使用构造函数模式。
组合继承
定义 使用原型链实现多原型属性和方法的继承,使用构造函数实现实例的继承
代码1
2
3
4
5
6
7
8
9
10
11
12
13
14
15
16
17
18
19
20
21functionSuperType(name){
this.name = name;
this.colors = ['red','black'];
}
SuperType.prototype.sayName = function()
{
alert(this.name);
}
functionSubType(name,age){
SuperType.call(this,name);
this.age = age;
}
SubType.protptype = new SuperType();
SubType.protptype.sayAge = function(){
alert(this.age);
}
- 优点 解决了构造函数和原型继承中的两个问题
- 缺点 无论什么时候,都会调用两次超类型的构造函数