keep-alive
keep-alive是Vue提供的一个抽象组件,用来对组件进行缓存,从而节省性能,由于是一个抽象组件,所以在v页面渲染完毕后不会被渲染成一个DOM元素1
2
3
4
5
6
7
8//keep-alive 用来缓存组件,避免多次加载相应的组件,减少性能消耗
<template>
<div id="app">
<keep-alive>
<router-view></router-view>
</keep-alive>
</div>
</template>
<keep-alive>包裹动态组件时,会缓存不活动的组件实例,而不是销毁它们。和相似, 是一个抽象组件:它自身不会渲染一个 DOM 元素,也不会出现在父组件链中。 keep-alive内被切换时组件的activated、deactivated这两个生命周期钩子函数会被执行
- 被包裹在keep-alive中的组件的状态将会被保留,例如我们将某个列表类组件内容滑动到第10条位置,那么我们在切换到一个组件后再次切换回到该组件,该组件的位置状态依旧会保持在第10条列表处.
我们在创建一个router实例的时候,可以提供一个scrollBehavior方法,该方法会在用户切换路由时触发1
2
3
4
5
6
7
8
9
10
11
12
13
14
15
16
17
18
19
20
21
22
23
24
25
26
27
28const router=new VueRouter({
routes:[
{
path:"/",
component:Home
}
],
scrollBehavior(to,form,savedPosition){
//scrollBehavior方法接收to,form路由对象
//第三个参数savedPosition当且仅当在浏览器前进后退按钮触发时才可用
//该方法会返回滚动位置的对象信息,如果返回false,或者是一个空的对象,那么不会发生滚动
//我们可以在该方法中设置返回值来指定页面的滚动位置,例如:
return {x:0,y:0}
//表示在用户切换路由时让是所有页面都返回到顶部位置
//如果返回savedPosition,那么在点击后退按钮时就会表现的像原生浏览器一样,返回的页面会滚动过到之前按钮点击跳转的位置,大概写法如下:
if(savedPosition){
return savedPosition
}else{
return {x:0,y:0}
}
//如果想要模拟滚动到锚点的行为:
if(to.hash){
return {
selector:to.hash
}
}
}
})
还有一个方法就是利用我们上面说过的,在keep-alive激活会触发activated钩子函数,那么在该函数内设置scrollTop为0
被keep-alive包裹的动态组件或router-view会缓存不活动的实例,再次被调用这些被缓存的实例会被再次复用,对于我们的某些不是需要实时更新的页面来说大大减少了性能上的消耗,不需要再次发送HTTP请求,但是同样也存在一个问题就是被keep-alive包裹的组件我们请求获取的数据不会再重新渲染页面,这也就出现了例如我们使用动态路由做匹配的话页面只会保持第一次请求数据的渲染结果,所以需要我们在特定的情况下强制刷新某些组件
利用include、exclude属性
prop:
- include: 字符串或正则表达式。只有匹配的组件会被缓存,keep-alive组件激活时调用。
- exclude: 字符串或正则表达式。任何匹配的组件都不会被缓存,组件停用时调用。
1 | <keep-alive include="bookLists,bookLists"> |
include属性表示只有name属性为bookLists,bookLists的组件会被缓存,(注意是组件的名字,不是路由的名字)其它组件不会被缓存exclude属性表示除了name属性为indexLists的组件不会被缓存,其它组件都会被缓存1
2
3
4
5
6
7
8
9
10
11
12
13
14
15
16
17
18
19
20
21
22
23
24//利用meta属性
export default[
{
path:'/',
name:'home',
components:Home,
meta:{
keepAlive:true //需要被缓存的组件
},
{
path:'/book',
name:'book',
components:Book,
meta:{
keepAlive:false //不需要被缓存的组件
}
]
<keep-alive>
<router-view v-if="this.$route.meat.keepAlive"></router-view>
<!--这里是会被缓存的组件-->
</keep-alive>
<keep-alive v-if="!this.$router.meta.keepAlive"></keep-alive>
<!--这里是不会被缓存的组件-->
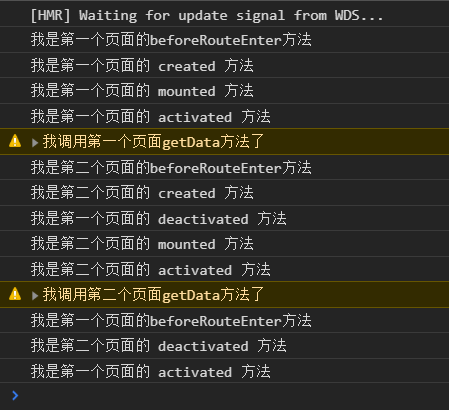
当引入keep-alive的时候,页面第一次进入,钩子的触发顺序 created-> mounted-> activated,退出时触发deactivated。当再次进入(前进或者后退)时,只触发activated。1
2
3
4
5
6
7
8
9
10
11
12
13
14//$route发生变化时再次赋值listId
watch: {
'$route'() {
this.listId = this.$route.params.id;
}
},
//通过activated钩子触发请求函数
activated() {
this.getDetail();
},
//返回详情页面时 隐藏内容div区块 再进入详情时 显示内容div区块
deactivated() {
this.isShowContent = false;
}
DEMO前进刷新,后退不刷新
App.vue
1 | <template> |
router/index.js
1 | import Vue from 'vue' |
page.vue page1.vue page2.vue page3.vue
1 | //page.vue |
依次加入page1,page2,page1 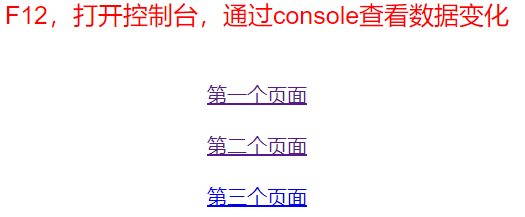
vue-keep-scroll-position
1 | (function () { |
Install1
npm i -S vue-keep-scroll-position
Use:1
2
3import Vue from 'vue'
import VueKeepScrollPosition from 'vue-keep-scroll-position'
Vue.use VueKeepScrollPosition
只需添加v-keep-scroll-position到您的组件内即可1
2
3<keep-alive>
<router-view v-keep-scroll-position> </router-view>
</keep-alive>
对于简单的动态组件:1
2
3<keep-alive>
<component :is="someComponentName" v-keep-scroll-position></component>
</keep-alive>
keep-alive组件实现原理
Vue源码keep-alive.js文件地址
深入keep-alive组件实现
说完了keep-alive组件的使用,我们从源码角度看一下keep-alive组件究竟是如何实现组件的缓存的呢?
- 首先,你要知道Vue.js内部将DOM节点抽象成了一个个的VNode节点,这个我之前写过相关文章可以参考VNode节点。所以,keep-alive的缓存也是基于VNode节点的而不是直接存储DOM结构。
- 其实就是将需要缓存的VNode节点保存在this.cache中/在render时,如果VNode的name符合在缓存条件(可以用include以及exclude控制),则会从this.cache中取出之前缓存的VNode实例进行渲染。
1 | type VNodeCache = { [key: string]: ?VNode }; |
created与destroyed钩子
created钩子会创建一个cache对象,用来作为缓存容器,保存vnode节点。1
2
3
4
5
6
7
8
9type VNodeCache = { [key: string]: ?VNode }; //缓存keep-alive对象VNodeCache
...
created () {
/* 缓存对象 */
this.cache = Object.create(null)
},
destroyed钩子则在组件被销毁的时候清除cache缓存中的所有组件实例。1
2
3
4
5
6/* destroyed钩子中销毁所有cache中的组件实例 */
destroyed () {
for (const key in this.cache) {
pruneCacheEntry(this.cache[key])
}
},
render
接下来是render函数。1
2
3
4
5
6
7
8
9
10
11
12
13
14
15
16
17
18
19
20
21
22
23
24
25
26
27
28
29
30
31
32render () {
/* 得到slot插槽中的第一个组件 */
const vnode: VNode = getFirstComponentChild(this.$slots.default)
const componentOptions: ?VNodeComponentOptions = vnode && vnode.componentOptions
if (componentOptions) {
// check pattern
/* 获取组件名称,优先获取组件的name字段,否则是组件的tag */
const name: ?string = getComponentName(componentOptions)
/* name不在inlcude中或者在exlude中则直接返回vnode(没有取缓存) */
if (name && (
(this.include && !matches(this.include, name)) ||
(this.exclude && matches(this.exclude, name))
)) {
return vnode
}
const key: ?string = vnode.key == null
// same constructor may get registered as different local components
// so cid alone is not enough (#3269)
? componentOptions.Ctor.cid + (componentOptions.tag ? `::${componentOptions.tag}` : '')
: vnode.key
/* 如果已经做过缓存了则直接从缓存中获取组件实例给vnode,还未缓存过则进行缓存 */
if (this.cache[key]) {
    vnode.componentInstance = this.cache[key].componentInstance
} else {
    this.cache[key] = vnode
}
/* keepAlive标记位 */
vnode.data.keepAlive = true
}
return vnode
}
首先通过getFirstComponentChild获取第一个子组件,获取该组件的name(存在组件名则直接使用组件名,否则会使用tag)。接下来会将这个name通过include与exclude属性进行匹配,匹配不成功(说明不需要进行缓存)则不进行任何操作直接返回vnode,vnode是一个VNode类型的对象,不了解VNode的同学可以参考笔者的另一篇文章《VNode节点》 .1
2
3
4
5
6
7
8
9
10
11
12/* 检测name是否匹配 */
function matches (pattern: string | RegExp, name: string): boolean {
if (typeof pattern === 'string') {
/* 字符串情况,如a,b,c */
return pattern.split(',').indexOf(name) > -1
} else if (isRegExp(pattern)) {
/* 正则 */
return pattern.test(name)
}
/* istanbul ignore next */
return false
}
检测include与exclude属性匹配的函数很简单,include与exclude属性支持字符串如”a,b,c”这样组件名以逗号隔开的情况以及正则表达式。matches通过这两种方式分别检测是否匹配当前组件。1
2
3
4
5if (this.cache[key]) {
vnode.componentInstance = this.cache[key].componentInstance
} else {
this.cache[key] = vnode
}
接下来的事情很简单,根据key在this.cache中查找,如果存在则说明之前已经缓存过了,直接将缓存的vnode的componentInstance(组件实例)覆盖到目前的vnode上面。否则将vnode存储在cache中。
最后返回vnode(有缓存时该vnode的componentInstance已经被替换成缓存中的了)。
watch
用watch来监听pruneCache与pruneCache这两个属性的改变,在改变的时候修改cache缓存中的缓存数据。
1 | watch: { |
来看一下pruneCache的实现。
1 | /* 修正cache */ |
遍历cache中的所有项,如果不符合filter指定的规则的话,则会执行pruneCacheEntry。pruneCacheEntry则会调用组件实例的$destroy方法来将组件销毁。
最后
Vue.js内部将DOM节点抽象成了一个个的VNode节点,keep-alive组件的缓存也是基于VNode节点的而不是直接存储DOM结构。它将满足条件(pruneCache与pruneCache)的组件在cache对象中缓存起来,在需要重新渲染的时候再将vnode节点从cache对象中取出并渲染。