在实现一个自定义滚动条需求的时候,需要监听到某个div元素的宽高变化,第一时间想到的是resize事件,但是很不幸运的是,resize事件只能加在window对象上,并不能监听具体某个DOM元素。
多方查阅之后,了解到MutationObserver和Resize Observer, DOMSubtreeModified ,迫不及待的直接看直接看 resize-detector实现方式 可以用来监听整个DOM中任何变化的东西,可以把它理解为一个类,实例化之后调用类实例的几个简单接口即可完成监听,以下具体介绍:
MutationObserver介绍
构造函数为window.MutationObserver,参数为一个回调函数。
监控到DOM中的改变并且等待一系列改变结束后就会触发回调函数。它与事件的不同之处在于,它在DOM变化时,会记录每一个DOM的变化(为一个MutationRecord对象),但是到DOM变化结束时触发回调。DOM变化可能是一系列的(比如元素的宽和高同时改变),那么这一系列的变化就会产生一个队列,这个队列会作为参数传递给回调函数。
由于浏览器差异的原因,一些版本的浏览器各自支持了构造函数,但是用法都是一样的,实例化一个观察者的代码如下:
1 | let MutationObserver = window.MutationObserver || |
调用接口开始监控DOM。
常用的接口有三个:
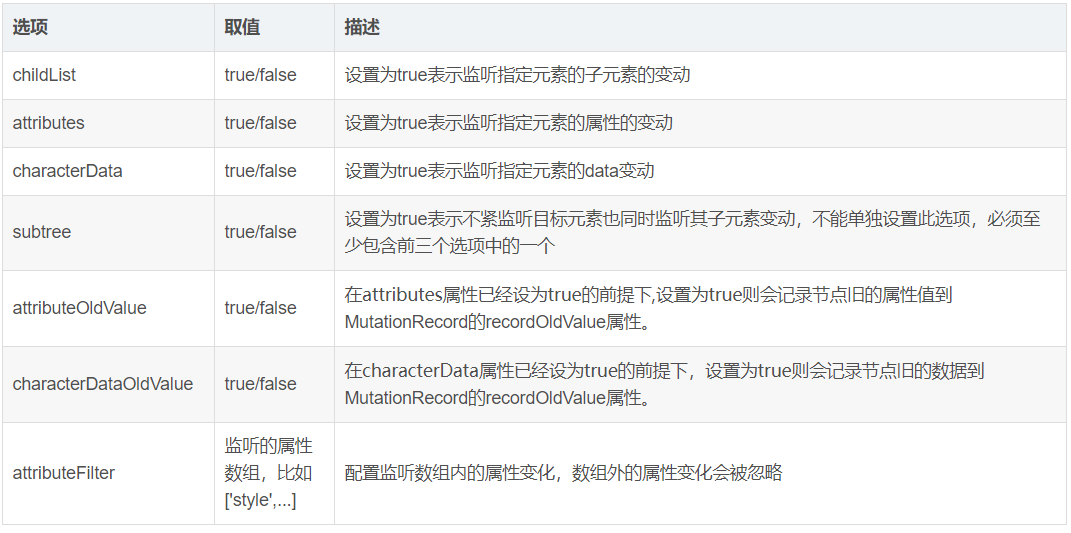
observe(element, options) 配置
MutationObserver在DOM更改匹配给定选项时,通过其回调函数开始接收通知。element即要监听的DOM元素,options为监听选项对象,可选的选项如下:
所以监听元素宽高变化,就是监听其style属性变化:1
2
3
4
5observer.observe(element, {
attributes: true,
attributeFilter: ['style'],
attributeOldValue: true
})
这样当元素的style发生改变的时候,就会触发构造函数中传入的callback函数。
disconnect()
阻止 MutationObserver实例继续接收的通知,直到再次调用其observe方法,该观察者对象包含的回调函数都不会再被调用。takeRecords() 从MutationObserver的通知队列中删除所有待处理的通知,并将它们返回到一个MutationRecord对象构成的新数组中。
示例
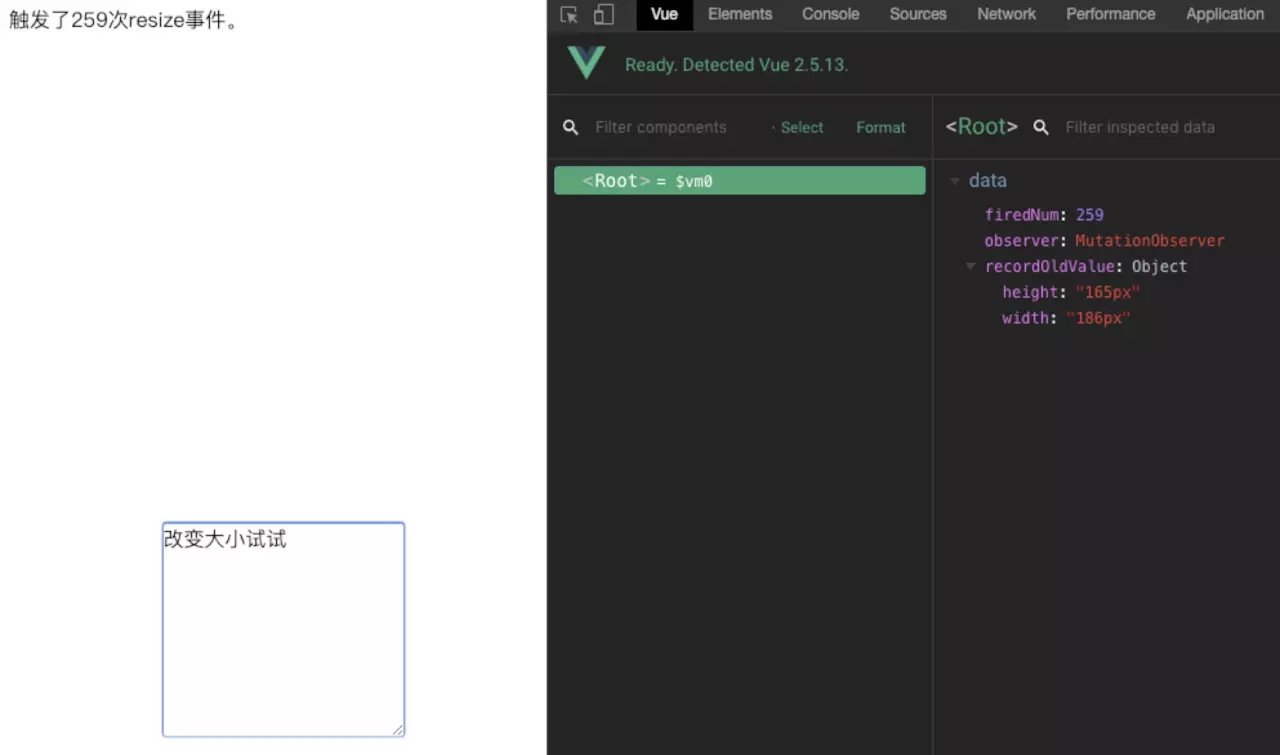
这里以Vue中的一个组件作为实例,了解了以上所述内容后其实非常简单,代码如下:
1
2
3
4
5
6
7
8
9
10
11
12
13
14
15
16
17
18
19
20
21
22
23
24
25
26
27
28
29
30
31
32
33
34
35
36
37
38
39
40
41
42
43
44
45
46
47
48
49
50
51
52
53
54
55
56
57
58
59
60
61
62
63
64
65
66
67
68
69
70
71
72
73
74
75
76
77
78
79
80
81
82
83
84
85
86
87
88
89
<html>
<head>
<meta charset="UTF-8">
<title></title>
<script src="js/vue.js" type="text/javascript" charset="utf-8"></script>
<style type="text/css">
html,body{
width: 100%;
height: 100%;
}
.container {
width: 100%;
height: 100%;
position: relative
}
.resize-element {
position: absolute;
top: 50%;
left: 50%;
height: 10rem;
width: 10rem;
transform: translate(-50%,-50%);
overflow: hidden;
resize: both; /*用户可以调节元素的宽度和高度*/
display: block;
box-shadow: 0 0 1px 1px #3361D8;
border-radius: 2px;
}
</style>
</head>
<body>
<div class="container" id="main">
<div class="resize-element">
改变大小试试
</div>
<div class="resize-record">
触发了{{firedNum}}次resize事件。
</div>
</div>
<script type="text/javascript">
new Vue({
el: "#main",
data: {
observer: null,
firedNum: 0,
recordOldValue: { // 记录下旧的宽高数据,避免重复触发回调函数
width: '0',
height: '0'
}
},
mounted() {
let MutationObserver = window.MutationObserver || window.WebKitMutationObserver || window.MozMutationObserver
let element = document.querySelector('.resize-element')
this.observer = new MutationObserver((mutationList) => {
for(let mutation of mutationList) {
console.log(mutation)
}
let width = getComputedStyle(element).getPropertyValue('width')
let height = getComputedStyle(element).getPropertyValue('height')
if(width === this.recordOldValue.width && height === this.recordOldValue.height) return
this.recordOldValue = {
width,
height
}
this.firedNum += 1
})
this.observer.observe(element, {
attributes: true,
attributeFilter: ['style'],
attributeOldValue: true
})
},
beforeDestroyed() {
if(this.observer) {
this.observer.disconnect()
this.observer.takeRecords()
this.observer = null
}
}
})
</script>
</body>
</html>
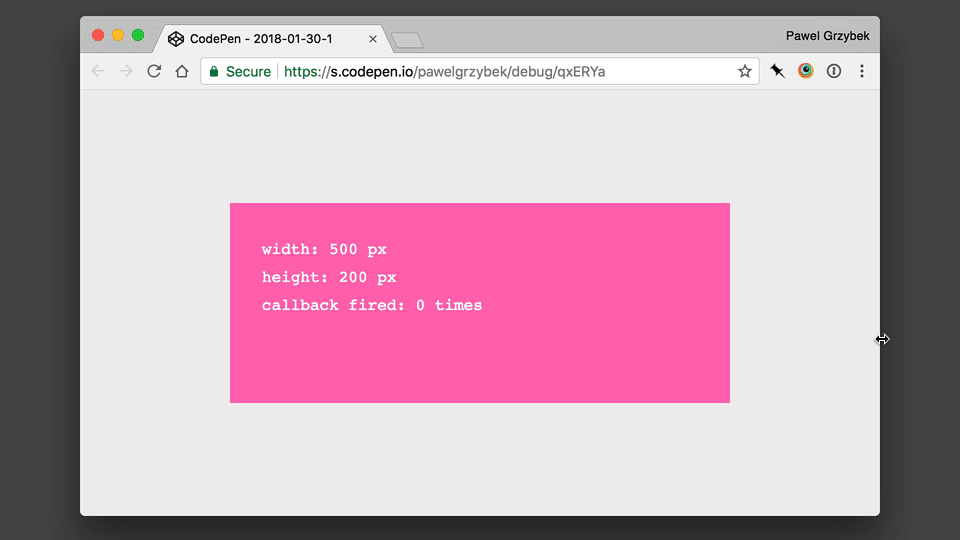
这里记录了旧的宽高数据来避免重复触发回调函数,这样做的原因在于宽高数据改变时,不一定是整数,而MutationRecord.recordOldValue中记录的是取整后的数据,这样就会导致在拖动改变DOM元素的宽高时,数值一直在整数和小数之间跳动,会多次触发。
MutationObserver实现Vue nextTick
Vue 倡导开发者尽量不直接操作DOM,但有的时候由于各种需求让开发者不得不这样做,于是 nextTick 的实现就是让开发者在修改数据后,能够在数据更新到DOM后才执行对应的函数,从而获取最新的 DON 数据。
那么如何实现 nextTick呢,我们首先可以想到的是利用 setTimeout 的异步回调来实现,不过由于各个浏览器的不同,setTimeout 的延迟很高,因此在 nextTick 中只作为最后的备胎,首选的方案则是 MutationObserver(在后面的内容中 MO 代表 MutationObserver)
nextTick 的源码实现
1 | export const nextTick = (function () { |
从Vue 2.5+开始,抽出来了一个单独的文件next-tick.js来执行它
面试之Vue.$nextTick原理1
2
3
4
5
6
7
8
9
10
11
12
13
14
15
16
17
18
19
20
21
22
23
24
25
26
27
28
29
30
31
32
33
34
35
36
37
38
39
40
41
42
43
44
45
46
47
48
49
50
51
52
53
54
55
56
57
58
59
60
61
62
63
64
65
66
67
68
69
70
71
72
73
74
75
76
77
78
79
80
81
82
83
84
85
86
87
88
89
90
91
92
93
94
95
96
97
98
99
100
101
102
103
104
105
106
107
108
109
110
111
112
113
114
115
116
117
118
119
120
121
122
123
124
125
126
127
128
129
130
131
132
133
134
135
136
137
138
139
140
141
142
143
144
145
146
147
148
149
150
151
152
153
154
155
156
157
158
159
160
161
162
163 /*
延迟一个任务使其异步执行,在下一个tick时执行,一个立即执行函数,返回一个function
这个函数的作用是在task或者microtask中推入一个timerFunc,
在当前调用栈执行完以后以此执行直到执行到timerFunc
目的是延迟到当前调用栈执行完以后执行
*/
/*存放异步执行的回调*/
const callbacks = []
/*一个标记位,如果已经有timerFunc被推送到任务队列中去则不需要重复推送*/
let pending = false
/*下一个tick时的回调*/
function flushCallbacks () {
/*一个标记位,标记等待状态(即函数已经被推入任务队列或者主线程,已经在等待当前栈执行完毕去执行),这样就不需要在push多个回调到callbacks时将timerFunc多次推入任务队列或者主线程*/
pending = false
//复制callback
const copies = callbacks.slice(0)
//清除callbacks
callbacks.length = 0
for (let i = 0; i < copies.length; i++) {
//触发callback的回调函数
copies[i]()
}
}
// Here we have async deferring wrappers using both microtasks and (macro) tasks.
// In < 2.4 we used microtasks everywhere, but there are some scenarios where
// microtasks have too high a priority and fire in between supposedly
// sequential events (e.g. #4521, #6690) or even between bubbling of the same
// event (#6566). However, using (macro) tasks everywhere also has subtle problems
// when state is changed right before repaint (e.g. #6813, out-in transitions).
// Here we use microtask by default, but expose a way to force (macro) task when
// needed (e.g. in event handlers attached by v-on).
/**
其大概的意思就是:在Vue2.4之前的版本中,nextTick几乎都是基于microTask实现的,
但是由于microTask的执行优先级非常高,在某些场景之下它甚至要比事件冒泡还要快,
就会导致一些诡异的问题;但是如果全部都改成macroTask,对一些有重绘和动画的场
景也会有性能的影响。所以最终nextTick采取的策略是默认走microTask,对于一些DOM
的交互事件,如v-on绑定的事件回调处理函数的处理,会强制走macroTask。
**/
let microTimerFunc
let macroTimerFunc
let useMacroTask = false
// Determine (macro) task defer implementation.
// Technically setImmediate should be the ideal choice, but it's only available
// in IE. The only polyfill that consistently queues the callback after all DOM
// events triggered in the same loop is by using MessageChannel.
/* istanbul ignore if */
/**
而对于macroTask的执行,Vue优先检测是否支持原生setImmediate(高版本IE和Edge支持),
不支持的话再去检测是否支持原生MessageChannel,如果还不支持的话为setTimeout(fn, 0)。
**/
if (typeof setImmediate !== 'undefined' && isNative(setImmediate)) {
macroTimerFunc = () => {
setImmediate(flushCallbacks)
}
} else if (typeof MessageChannel !== 'undefined' && (
// MessageChannel与原先的MutationObserver异曲同工
/**
在Vue 2.4版本以前使用的MutationObserver来模拟异步任务。
而Vue 2.5版本以后,由于兼容性弃用了MutationObserver。
Vue 2.5+版本使用了MessageChannel来模拟macroTask。
除了IE以外,messageChannel的兼容性还是比较可观的。
**/
isNative(MessageChannel) ||
// PhantomJS
MessageChannel.toString() === '[object MessageChannelConstructor]'
)) {
/**
可见,新建一个MessageChannel对象,该对象通过port1来检测信息,port2发送信息。
通过port2的主动postMessage来触发port1的onmessage事件,
进而把回调函数flushCallbacks作为macroTask参与事件循环。
**/
const channel = new MessageChannel()
const port = channel.port2
channel.port1.onmessage = flushCallbacks
macroTimerFunc = () => {
port.postMessage(1)
}
} else {
/* istanbul ignore next */
//上面两种都不支持,用setTimeout
macroTimerFunc = () => {
setTimeout(flushCallbacks, 0)
}
}
// Determine microtask defer implementation.
/* istanbul ignore next, $flow-disable-line */
if (typeof Promise !== 'undefined' && isNative(Promise)) {
/*使用Promise*/
const p = Promise.resolve()
microTimerFunc = () => {
p.then(flushCallbacks)
// in problematic UIWebViews, Promise.then doesn't completely break, but
// it can get stuck in a weird state where callbacks are pushed into the
// microtask queue but the queue isn't being flushed, until the browser
// needs to do some other work, e.g. handle a timer. Therefore we can
// "force" the microtask queue to be flushed by adding an empty timer.
//iOS的webview下,需要强制刷新队列,执行上面的回调函数
if (isIOS) setTimeout(noop)
}
} else {
// fallback to macro
microTimerFunc = macroTimerFunc
}
/**
* Wrap a function so that if any code inside triggers state change,
* the changes are queued using a (macro) task instead of a microtask.
*/
/**
在Vue执行绑定的DOM事件时,默认会给回调的handler函数调用withMacroTask方法做一层包装,
它保证整个回调函数的执行过程中,遇到数据状态的改变,这些改变而导致的视图更新(DOM更新)
的任务都会被推到macroTask而不是microtask。
**/
export function withMacroTask (fn: Function): Function {
return fn._withTask || (fn._withTask = function () {
useMacroTask = true
const res = fn.apply(null, arguments)
useMacroTask = false
return res
})
}
/*
推送到队列中下一个tick时执行
cb 回调函数
ctx 上下文
*/
export function nextTick (cb?: Function, ctx?: Object) {
let _resolve
/*cb存到callbacks中*/
callbacks.push(() => {
if (cb) {
try {
cb.call(ctx)
} catch (e) {
handleError(e, ctx, 'nextTick')
}
} else if (_resolve) {
_resolve(ctx)
}
})
if (!pending) {
pending = true
if (useMacroTask) {
macroTimerFunc()
} else {
microTimerFunc()
}
}
// $flow-disable-line
if (!cb && typeof Promise !== 'undefined') {
return new Promise(resolve => {
_resolve = resolve
})
}
}
看了源码发现timerFunc会检测当前环境而不同实现,其实就是按照Promise,MutationObserver,setTimeout优先级,哪个存在使用哪个,最不济的环境下使用setTimeout
setTimeout是最后的一种备选方案,并且默认有4ms延时,setTimeout延时0不会老老实实立即执行:1
2
3setTimeout(function(){
console.log("我不是立即执行的,一般我会延时4ms,哈哈");
},0);
优先使用Promise,在Promise不存在的情况下使用MutationObserver,这两个方法的回调函数都会在microtask中执行,它们会比setTimeout更早执行,所以优先使用。
如果上述两种方法都不支持的环境则会使用setTimeout,在task尾部推入这个函数,等待调用执行。
Event Loop
当一个程序有:setTimeout, setInterval ,setImmediate, I/O, UI渲染,Promise ,process.nextTick, Object.observe, MutationObserver的时候:
- 先执行 macrotasks:I/O -》 UI渲染
- 再执行 microtasks :process.nextTick -》 Promise -》MutationObserver ->Object.observe
- 再把setTimeout setInterval setImmediate 塞入一个新的macrotasks,依次: setTimeout ,setInterval –> setImmediate
综上,nextTick的目的就是产生一个回调函数加入task或者microtask中,当前栈执行完以后(可能中间还有别的排在前面的函数)调用该回调函数,起到了异步触发(即下一个tick时触发)的目的。
任务队列
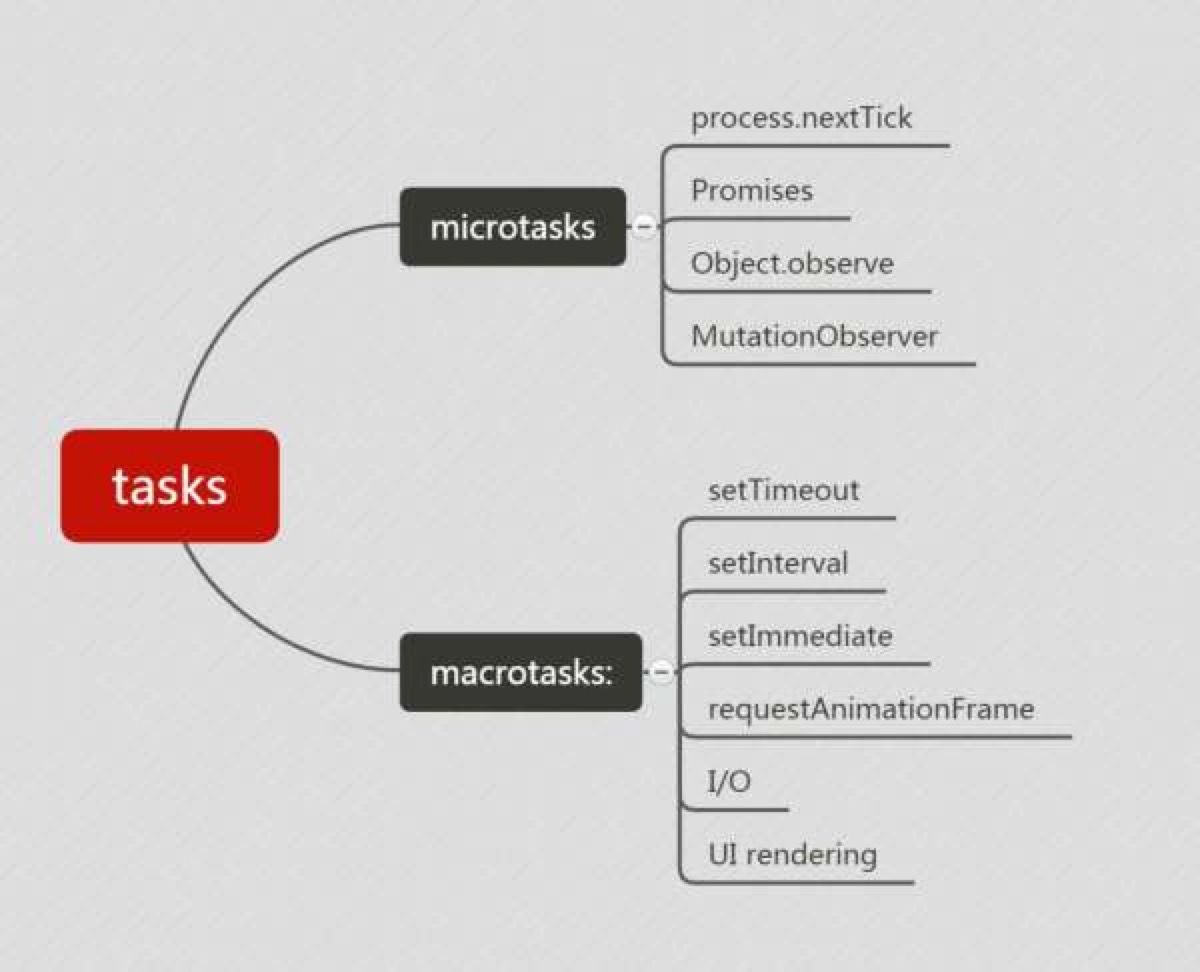
异步任务分为task(宏任务,也可称为macroTask)和microtask(微任务)两类。
当满足执行条件时,task和microtask会被放入各自的队列中等待放入主线程执行,我们把这两个队列称为Task Queue(也叫Macrotask Queue)和Microtask Queue。
macrotasks: script中代码, setTimeout ,setInterval, setImmediate,requestAnimationFrame, I/O ,UI渲染
microtasks: Promise, process.nextTick, Object.observe, MutationObserver
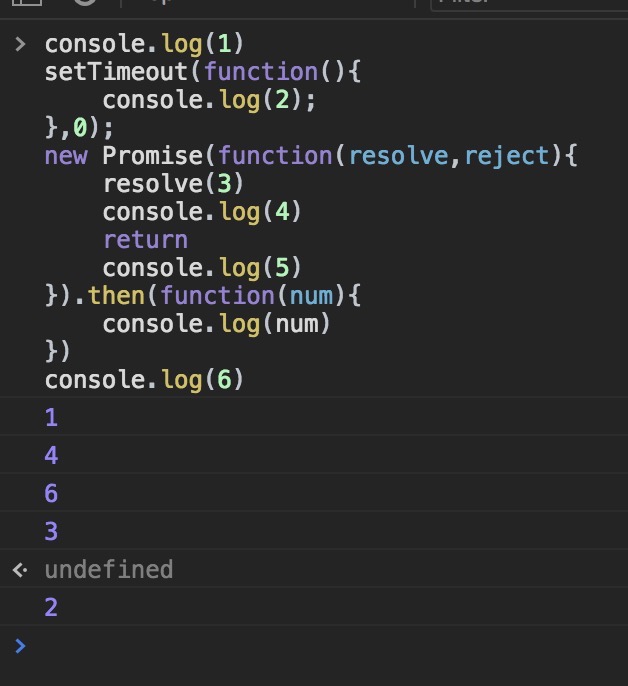
| microtask(微任务)一定比macroTask(宏任务)先执行吗:script中代码最先执行,但是script代码是macrotasks(宏任务) |
其实promise的then和catch才是microtask,本身的内部代码不是
具体过程
- 执行完主执行线程中的任务
- 取出Microtask Queue中任务执行直到清空。
- 取出Macrotask Queue中一个任务执行。
- 取出Microtask Queue中任务执行直到清空。
- 重复3和4。
即为同步完成,一个宏任务,所有微任务,一个宏任务,所有微任务……
MutationObserver 的功能和作用
MO 给开发者提供了一种能在某个范围内的DOM数发生变化时作出适当反应的能力
用人话说是开发者能通过它创建一个观察者对象,这个对象会监听某个DOM元素,并在它的DOM树发生变化时执行我们提供的回调函数。
具体参考这个 DEMO点击预览
比较特别的是实例化的时候需要先传入回调函数:1
2
3
4
5var observer = new MutationObserver(function(mutations) {
mutations.forEach(function(mutation) {
console.log(mutation.type);
})
})
然后才配置观察选项,包括观察节点和观察的属性:
1 | // 选择目标节点 |
对于老版本的谷歌和火狐,则需要使用带前缀的 MO:
1 | var MutationObserver = window.MutationObserver || |
MutationObserver 和 microtask
那么为什么优选使用 MutationObserver呢?
一开始以为是 MO 就是用来监听 DOM 变化的,那么使用 textnode 模拟 DOM 变化再利用 MO 来监听触发从而实现 nextTick 不就很适合,直到了解看到了知乎上的问答才知道是因为 MO 会比 setTimeout 早执行的缘故,
这里需要了解JS的运行运行机制(重新刷新了我的三观), JS 的事件运行机制执行的时候会区分 task 和 microtask, 引擎在每个 task 执行完毕,并在从队列里取下一个task来执行之前, 执行完所有的 microtask 队列中的 microtask.
setTimeout 回调会被分配到一个新的task中等待执行,而 Promise 的 resolver、MO 的 回调都会被分配到 microtask 的队列中,所以会比 setTimout 先执行.
除了比 setTimout 快之外,还有 渲染性能 的问题,根据HTML Standard, 每个 task 运行完以后, UI 都会重新渲染,那么在 microtask 中就完成数据更新, 当前 task 结束就可以得到最新的 UI, 反之如果新建一个 task 来做数据更新,那么渲染就会进行两次。
所以性价比如此高的 MO 自然成为了首选
关于 microtask,具体可以阅读 Jake 写的 Tasks, microtasks, queues and schedules
Vue nextTick的版本迭代
上面关于 nextTick 的源码实现属于 vue 最早的版本 v1.0.9,在深挖 mutationObserver 的时候发现 nextTick 在vue的版本迭代中也在不断的进化,同事也发生过退化,非常有趣:
先说说退化的事件,尤大(vue的作者)曾经使用 window.postMessage 来替代 MO 实现 nextTick,结果开发者使用后发现了问题,可以看看这两个 JSFiddle:jsfiddle1点击预览 和 jsfiddle2点击预览, 两个例子用了不同版本来实现元素的绝对定位,第一个使用的是 2.0.0-rc6,这个版本采用的是 MO,而后来因为 IOS 9.3 的 WebView 里 MO 有 bug,尤大便换成 window.postMessage来实现,即第二个实例版本为 2.0.0-rc7, 但是由于 postMessage 会将回调放到 macrotask 其实也就是 task 里面,导致可能执行了多次 UI 的task都没有执行 window.postMessage 的 task,也就延迟了更新DOM操作的时间。尤大在后续版本撤回了这一次修改,具体的讨论可以看issue
关于进化,在后续的版本里,由于 es6 的新语法,nextTick 开始使用 Promise.then 和 MO 来做首选和次选,在前面的讨论中已经提到,Promise.then 也属于 microtask。
Resize Observer
Resize Observer是一个新的JavaScript API,与Intersection Observer API、Mutation Observer等其他观察者API非常相似。
它允许在尺寸发生变化时通知元素。
ResizeObserver的解释:开发过程当中经常遇到的一个问题就是如何监听一个 div 的尺寸变化。但众所周知,为了监听 div 的尺寸变化,都将侦听器附加到 window 中的 resize 事件。但这很容易导致性能问题,因为大量的触发事件。换句话说,使用 window.resize 通常是浪费的,因为它告诉我们每个视窗大小的变化,而不仅仅是当一个元素的大小发生变化。
使用 ResizeObserver 的API的另一个用例就是视窗 resize 事件不能帮助我们:当元素被动态地添加或删除时,会影响父元素的大小。这也是现代单页应用程序越来越频繁使用 ResizeObserver 原因之一。
通过 window.resize 事件的监听,可以调用一个回调函数。在这个回调函数中做我们需要做的事情。
1 | // define a callback |
比如说,你要调整一个元素的大小,那就需要在 resize 的回调函数 callback() 中调用 getBoundingClientRect 或 getComputerStyle 不过你要是不小心处理所有的读和写操作,就会导致布局混乱。比如下面这个小示例:
当你改变浏览器视窗大小的时候,就可以看到相应的变化:
这也就是为什么 ResizeObserver 是一个有用的API。它对所观察到的任何元素的大小的变化做出反应,而不依赖于所引起的变化。它还提供了对所观察元素的新大小的访问。那接下来让我们直接切入正题。
简单总结一下:
ResizeObserver 允许我们观察DOM元素的内容矩形大小(宽度、高度)的变化,并做出相应的响应。它就像给元素添加 document.onresize() 或 window.resize() 事件(但在JavaScript中,只有 window 才有 resize 事件)。当元素改变大小而不调整视窗大小时,它是有用的。 下面描述一些调整观察者的行为:
- 当观察到的元素被插入或从DOM中删除时,观察将会触发
- 当观察到的元素 display 值为 none 时,观察都会触发
- 观察不会对未替换的内联元素(non-replaced inline element)触发
- 观察不会由CSS的 transform 触发
- 如果元素有显示,而且元素大小不是 0,0 ,观察将会触发
基本用法
使用Resize Observer非常简单,只需实例化一个新的ResizeObserver对象并传入一个回调函数,该函数接收观察到的条目
1 | const myObserver = new ResizeObserver(entries => { |
然后,我们可以在实例上调用observe并传入一个元素来观察
1 | const someEl = document.querySelector('.some-element'); |
对于每个entry,我们都会得到一个包含contentRect和一个target属性的对象。target是DOM元素本身,contentRect是具有以下属性的对象:width,height,x,y,top,right,bottom和left。
与元素的getBoundingClientRect不同,contentRect的width和height值不包含padding。contentRect.top是元素的顶部padding,contentRect.left是元素的左侧padding。
比如要打印出被监听元素寸尺变化时width和height的值,可以像下面这样做:1
2
3
4
5
6
7
8
9const myObserver = new ResizeObserver(entries => {
entries.forEach(entry => {
console.log('width', entry.contentRect.width);
console.log('height', entry.contentRect.height);
});
});
const someEl = document.querySelector('.some-element');
myObserver.observe(someEl);
上面的示例中,使用了forEach 循环来遍历观察者的回调中的 entries ,其实在 entries 上使用 for … of 可以得到相同的效果
Resize Observer API 示例
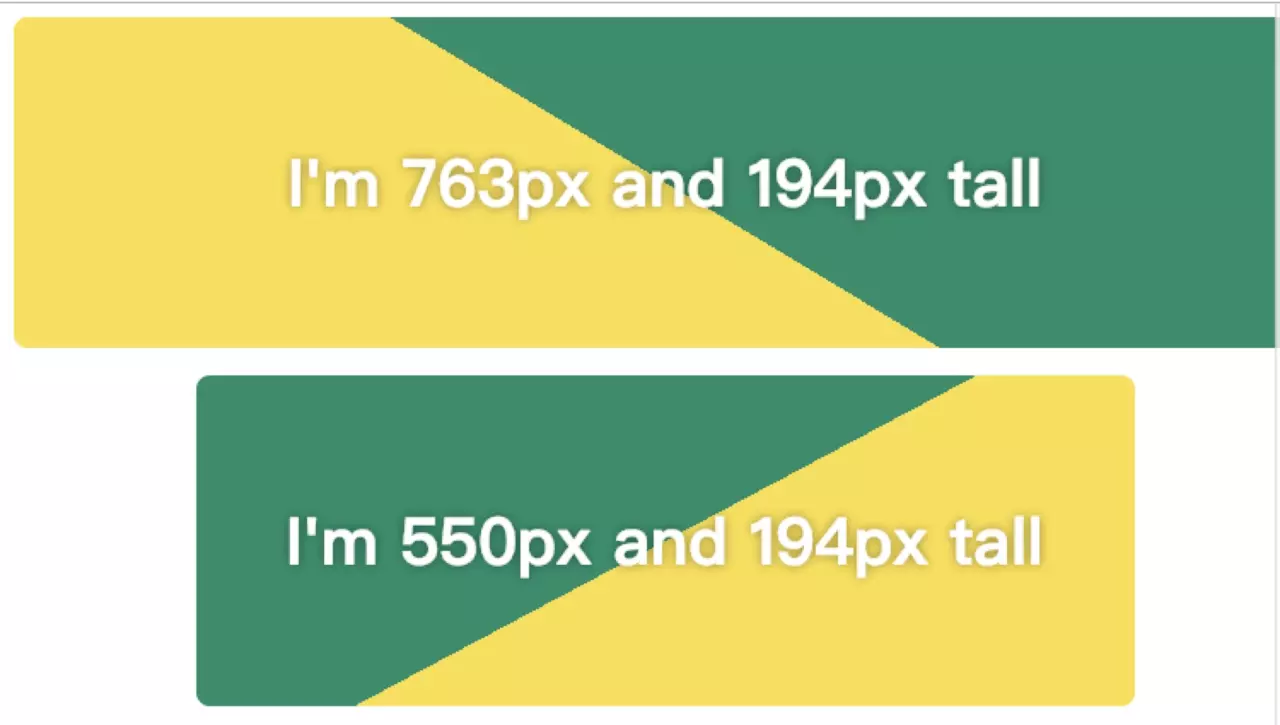
下面是一个简单的演示,以查看Resize Observer API的实际应用。
通过调整浏览器窗口的大小来尝试一下,注意渐变角度和文本内容仅在元素的大小受到影响时才发生变化:
1
2
3
4
5
6
7
8
9
10
11
12
13
14
15
16
17
18
19
20
21
22
23
24
25
26
27
28
29
30
31
32
33
34
35
36
37
38
39
40
41
42
43
44
45
46
47
48
49
50
51
52
53
54
55
56
57
58
59
60
61
62
63
64
65
66
67
68
69
70
<html>
<head>
<meta charset="UTF-8">
<title></title>
<script src="js/vue.js" type="text/javascript" charset="utf-8"></script>
<style type="text/css">
html,
body {
width: 100%;
height: 100%;
}
.box {
text-align: center;
height: 20vh;
border-radius: 8px;
box-shadow: 0 0 4px var(--subtle);
display: flex;
justify-content: center;
align-items: center;
}
.box h3 {
color: #fff;
margin: 0;
font-size: 5vmin;
text-shadow: 0 0 10px rgba(0, 0, 0, 0.4);
}
.box.small {
max-width: 550px;
margin: 1rem auto;
}
</style>
</head>
<body>
<div class="box">
<h3 class="info"></h3>
</div>
<div class="box small">
<h3 class="info"></h3>
</div>
<script type="text/javascript">
const boxes = document.querySelectorAll('.box');
const myObserver = new ResizeObserver(entries => {
for(let entry of entries) {
const infoEl = entry.target.querySelector('.info');
const width = Math.floor(entry.contentRect.width);
const height = Math.floor(entry.contentRect.height);
const angle = Math.floor(width / 360 * 100);
const gradient = `linear-gradient(${ angle }deg, rgba(0,143,104,1) 50%, rgba(250,224,66,1) 50%)`;
entry.target.style.background = gradient;
infoEl.innerText = `I'm ${ width }px and ${ height }px tall`;
}
});
boxes.forEach(box => {
myObserver.observe(box);
});
</script>
</body>
</html>
DOM变动事件的用法
DOM2级的変动事件是为XML或html的DOM设计的,不特定于某种语言。
变动事件的分类有7种,最常用的浏览器支持最多的有3种:
- DOMSubtreeModified:在DOM结构中发生任何变化时触发;
- DOMNodeInserted:在一个节点作为子节点被插入到另一个节点中时触发;
- DOMNodeRemoved:在节点从其父节点中被移除时触发;
- DOMNodeInsertedIntoDocument:在一个节点被直接插入文档中或者通过子树间接插入文档后触发。在DOMNodeInserted之后触发;
- DOMNodeRemovedFromDocument:在一个节点被直接从文档中删除或通过子树间接从文档中移除之前触发。在DOMNodeRemoved之后触发。
- DOMAttrModified:在特性被修改之后触发;
- DOMCharacterDataModified:在文本节点的值发生变化的时候触发。
删除节点检测?
- 首先触发的是DOMNodeRemoved事件,它对应的event对象中的target属性值是被删除的节点,relatedNode属性值是被删除节点的父节点,该事件会冒泡;
- 其次出发的是DOMNodeRemovedFromDocument事件,它对应的event对象中的target属性值为指定的被删除的子节点。只有绑定到它的子节点上才能被触发。
- 最后触发的是DOMSubtreeModified事件。这个事件对应event对象中的target属性是被移除节点的父节点。
(下面注释的序号为触发的顺序:)1
2
3
4
5
6
7
8
9
10
11
12
13
14
15
16
17
18
19
20
21
22
23
24
25
26
27
28functiongetFirstChild(obj){// 获取第一子节点(找到第一个不为空的节点)var first = obj.firstChild;
while(first.nodeType != 1){
first = first.nextSibling;
}
return first;
}
EventUtil.addHandler(window,"load",function(event){
varlist = document.getElementById('myList');
var btn = document.getElementById("mbtn");
EventUtil.addHandler(document,"DOMNodeRemoved",function(event){
console.log(event.type); //1:DOMNodeRemoved
console.log(event.target); //2:ul节点,即被删除的节点
console.log(event.relatedNode); //3:body节点,即被删除节点的父节点
})
EventUtil.addHandler(getFirstChild(list),"DOMNodeRemovedFromDocument",function(event){
console.log(event.type) //4:DOMNodeRemovedFromDocument
console.log(event.target) //5:li节点,即<li>item1</li>
});
EventUtil.addHandler(document,"DOMSubtreeModified",function(event){
console.log(event.type); //6:DOMSubtreeModified
console.log(event.target); //7:body节点,即被删除节点的父节点
})
EventUtil.addHandler(btn,'click',function(event){
list.parentNode.removeChild(list); //
})
})
插入节点检测?
在使用appendChild()、replaceChild()或insertBefore()向DOM中插入节点的时候:
- 首先触发DOMInserted事件,它对应的event对象中的target属性为添加的节点,relateNode属性对应被添加节点的父节点。(可冒泡);
- 其次触发的是DOMNodeInsertedIntoDocument事件,它对应的event对象中的target属性是添加的节点,只有指定给一个子节点的事件处理程序才会被调用
- 最后出发的是DOMSubtreeModified事件,它对应的event对象长得target属性值是新节点的父节点。
代码如下所示:
1 | functiongetFirstChild(obj){// 获取第一子节点(找到第一个不为空的节点)var first = obj.firstChild; |
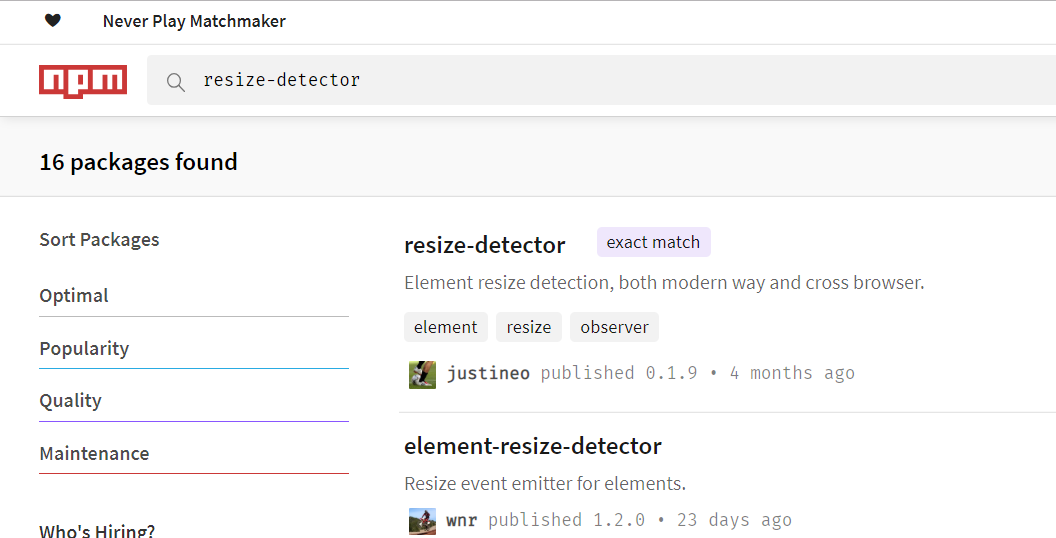
常用npm包
1 | element-resize-detector 【推荐】 |
使用
- Install
1 | cnpm i --save size-sensor |
1 | import { bind, clear } from 'size-sensor' |
- bind&unbind
1 | import { bind, clear } from 'size-sensor'; |
- clear
1 | import { bind, clear } from 'size-sensor'; |
- 实现方式:
resize-detector实现方式
Github
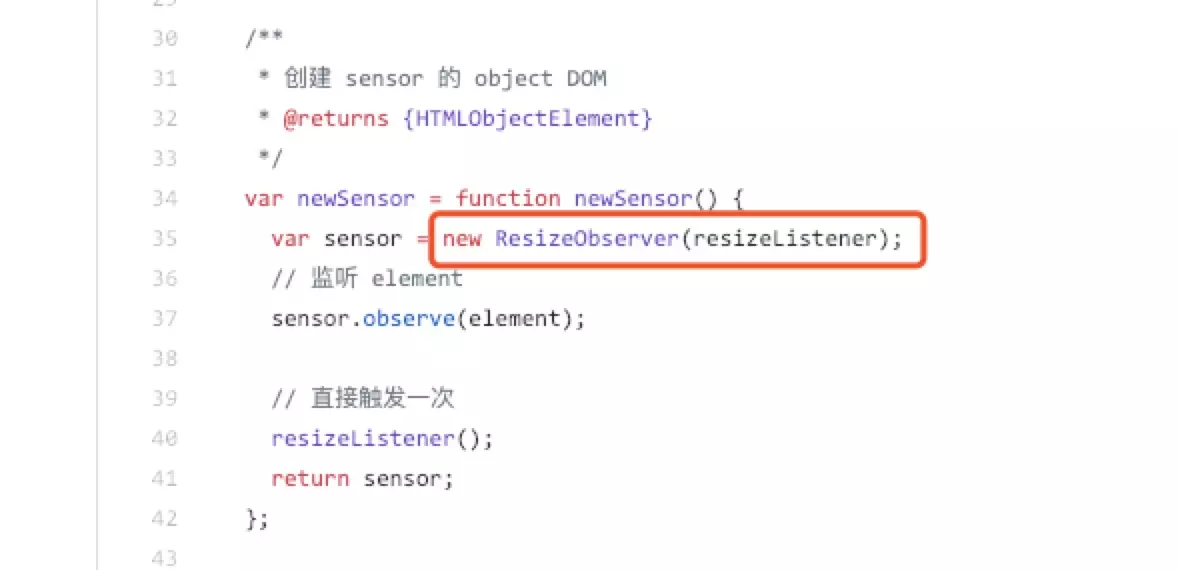
依次判断window.ResizeObserver,DOMSubtreeModified,window.MutationObserver
1 | import { |
1 | //util.js |
自适应滚动条
1 | <template> |
使用方法
1 | <template> |
模拟windows的resize
1 |
|
实现一个简单的div resize Listener
1 |
|