前言
抛开React不谈,Redux其实就只是一个管理状态的数据中心,然而作为一个数据中心它的特色在于我们不能够直接修改数据中心里面的数据,我们需要自行定义操作逻辑reducer,以及操作类型action,通过分发不同的action来匹配reducer里面对应的操作,才能达到修改数据的目的。
一般来说我们会通过以下方式来创建一个数据中心1
2import { createStore } from'redux'
const store = createStore(...blablabla)
这里最为关键的就是createStore这个函数,接下来我想详细地对它做个分析。
createStore方法剖析
createStore.js这个文件纯代码的部分大概有100多行,如果把他们全部贴出来再一一分析并非明智之举,我认为只对关键的部分进行分析是更恰当的做法。
要分析一个方法我觉得比较有意义的是看它接收了什么,以及返回了什么。
接收的参数
1 | export default function createStore(reducer, preloadedState, enhancer) { |
这个方法接受三个参数,分别是reducer, preloadedState, enhancer。以上都分别可以由开发者进行定义,reducer就是由开发者定义的一个操作方法,它会以旧的状态作为参数,处理过后返回一个新的状态。preloadedState则可以理解成数据中心的初始状态,它是个可选值。
最后的enhancer又是什么呢?从字面上理解它是一个增强器,用于增强createStore。从源码看它的工作方式1
2
3
4
5
6
7
8
9
10
11
12
13
14
15
16export default function createStore(reducer, preloadedState, enhancer) {
.....
if (typeof preloadedState === 'function' && typeof enhancer === 'undefined') { // 参数归一
enhancer = preloadedState
preloadedState = undefined
}
if (typeof enhancer !== 'undefined') {
if (typeof enhancer !== 'function') {
throw new Error('Expected the enhancer to be a function.')
}
return enhancer(createStore)(reducer, preloadedState) // 直接返回一个增强后的`createStore
}
.....
}
可见,它接收了原来的createStore作为参数,并且返回了一个增强了的方法,最后用增强过的方法来调用原来传入的参数。了解原理之后我们可以很容易地写出一个状态打印增强器,用于打印dispatch前后的状态信息。1
2
3
4
5
6
7
8
9
10
11
12
13
14
15
16
17
18
19
20
21.....
function enhancer(createStore) {
return (reducer, initialState, enhancer) => {
const store = createStore(reducer, initialState, enhancer)
function dispatch(action) {
console.log('old', store.getState())
const res = store.dispatch(action);
console.log('new', store.getState())
return res
}
// 用心的dispatch方法来替换原有的dispatch方法
return {
...store,
dispatch
}
}
}
const store = createStore(reducers, undefined, enhancer)
另外,从Redux的源码可以看到createStore做了一种叫做参数归一的处理,在许多JS库中都会采用这种方式兼容不同情况下的参数传入。当我们不需要传入初始状态,而只需要使用enhancer增强器的时候,我们还可以把代码写成这样1
const store = createStore(reducers, enhancer)
2) 返回值
接下来我们看看返回值。createStore最终会返回一个对象,包含的东西如下1
2
3
4
5
6
7
8
9
10
11
12import $$observable from 'symbol-observable'
export default function createStore(reducer, preloadedState, enhancer) {
.....
return {
dispatch,
subscribe,
getState,
replaceReducer,
[$$observable]: observable
}
}
这些便是我们数据中心为外部提供的全部接口了。最后一个看起来有点奇怪,其他的从字面上应该都比较容易理解,容许许我一一分析。
a. getState–返回当前状态
Redux的核心理念之一就是不支持直接修改状态,它是通过闭包来实现这一点。1
2
3
4
5
6
7
8export default function createStore(reducer, preloadedState, enhancer) {
let currentState = preloadedState
function getState() {
.....
return currentState
}
}
它先是定义了一个内部的变量currentState,然后通过一个名为getState的方法来返回它的值。这就造成了currentState这个状态对我们而言是只读的,我们没办法直接修改它的值。在代码里面我们可以通过getState这个方法来返回当前状态1
console.log(store.getState())
b. subscribe–构造监听者队列
每个store本身会维护一个监听者队列,我们可以把它想象成一个方法的队列,在每次分发action的时候都会依次调用监听者队列中所有方法。通过这个subscribe方法可以手动地把一些回调函数添加到监听者队列中1
2
3
4
5
6
7
8
9
10
11
12
13
14
15
16
17
18
19
20
21
22
23
24
25
26
27
28
29
30
31
32
33
34
35
36
37
38
39
40export default function createStore(reducer, preloadedState, enhancer) {
....
let currentListeners = []
let nextListeners = currentListeners
...
function ensureCanMutateNextListeners() {
if (nextListeners === currentListeners) {
nextListeners = currentListeners.slice()
}
}
...
function subscribe(listener) {
.....
let isSubscribed = true
ensureCanMutateNextListeners()
nextListeners.push(listener)
return function unsubscribe() {
if (!isSubscribed) {
return
}
....
isSubscribed = false
ensureCanMutateNextListeners()
const index = nextListeners.indexOf(listener)
nextListeners.splice(index, 1)
}
}
}
逻辑其实很简单,为了减少篇幅我把一些类型检查的代码去掉了。每次调用subscribe的时候传入一个回调函数,subscribe会把它放到一个监听者队列中去,并返回一个unsubscribe的方法。这个unsubscribe方法是让开发者可以方便地从列表中删除对应的回调函数,此外该方法还维护着一个isSubscribed标识订阅状态。
这里面有一个比较有意思的ensureCanMutateNextListeners的方法,按照代码的逻辑,它是要保证监听者的添加与删除并不在currentListeners这个原始的队列里面进行直接操作,我们操作的只是它的一个副本。直到我们调用dispatch方法进行分发的时候,currentListeners与nextListeners才会再一次指向同一个对象,这个在后面的代码里面会看到。
c. dispatch–低调的action分发者
dispatch方法是用来分发action的,可以把它理解成用于触发数据更新的方法。它的核心实现也比较简单
1 | export default function createStore(reducer, preloadedState, enhancer) { |
我依旧把一些类型检查的代码去掉,首先dispatch方法会以当前的状态currentState以及我们定义的动作action作为参数来调用当前的reducer方法。另外它使用isDispatching变量来记录分发的状态,正在分发则设置为true。这里需要注意的是我们的reducer方法将会被设置成一个纯函数–它不会产生副作用,并且对于同样的输入它会返回同样的输出。换句话说它不会直接在原来状态的基础上进行修改,而是会直接返回一个新的状态,并对原有状态进行替换。
完成了上面这些之后我们会依次遍历所有的监听者,并且手动调用所有的回调函数。这里需要注意的是之前有讲过的,订阅/取消订阅的时候我们会生成一个currentLIsteners的副本nextListeners并在它上面添加/删除回调函数。然而到了dispatch这一步他们会做一次同步,这样他们就又会指向同一个对象了。
d. replaceReducer–替换当前的reducer
replaceReducer这个方法做的事情其实很简单,它可以用新的reducer替换掉当前的reducer,并且分发一个替换的action,下面是源代码
1 | export default function createStore(reducer, preloadedState, enhancer) { |
据说这种方式在调试环境下会用得比较多。在正式环境下一般都不会在中途更替reducer,以免得增加维护成本。
e. observable–观察者
这个是比较让我费解的一个功能了,然而Redux的数据中心居然把它作为api开放出来,咱门先贴源码1
2
3
4
5
6
7
8
9
10
11
12
13
14
15
16
17
18
19
20
21
22
23
24
25export default function createStore(reducer, preloadedState, enhancer) {
....
function observable() {
const outerSubscribe = subscribe
return {
...
subscribe(observer) {
....
function observeState() {
if (observer.next) {
observer.next(getState())
}
}
observeState()
const unsubscribe = outerSubscribe(observeState)
return { unsubscribe }
},
[$$observable]() {
return this
}
}
}
}
如果直接调用这个接口,它会返回一个对象,而对象里面包含了subscribe方法,并且我们可以把一个包含next字段(它是一个函数)的对象作为subscribe方法的参数,就可以在每次数据变动的时候以当前状态getState()作为参数调用next所携带的函数。
这么说有点拗口,可能给个例子会比较直观
1 | import $$observable from 'symbol-observable' |
这样就可以做到每次动作被分发的时候都会调用next所携带的方法,并打印出getState()的值。这种观察者模式的写法有什么特殊的意义我也还没有时间去深究,似乎是草案的一部分,估计目前用的也不多,先不深入探究了。
1. 中间件
中间件这个概念存在于许多流行的Web框架中,可以把它想象成是请求/响应分发的中间层,用于对请求/响应做进一步的处理,而无需改变原有的代码逻辑。在node.js社区的KOA轻量级框架很出色地体现了这一点(当然它肯定不是第一个这样干的人)。koa本身只提供了最基础的请求/响应功能,如果想要更强大的功能(比如说日志,时间记录等功能)则需要自己添加相应的中间件。
Redux继承了这一理念,它把中间件应用到了dispatch方法的扩展中,让我们可以优雅地扩展dispatch方法,而不需要重写原有的dispatch方法,接下来我们好好体会一下它的精妙之处。
2. 中间件在Redux中的应用
在分析源码之前先来看看在Redux里面如何使用中间件,最关键的是applyMiddleware这个方法1
2
3
4
5
6
7
8
9
10
11
12
13
14import { createStore, applyMiddleware } from 'redux'
// Add thunk
import thunk from 'redux-thunk'
import logger from 'redux-logger'
const reducer = (state) => state
let newCreateStore = applyMiddleware(
logger,
thunk
)(createStore)
// 创建store,数据中心
let store = newCreateStore(reducer)
其中thunk跟logger就是我们提到的中间件,依次把它们传入applyMiddleware函数中,就会返回一个新的函数,然后再用这个函数处理原始的createStore方法就会返回一个增强过的createStore方法。
另外,还记得createStore函数可以接收enhancer这个参数不?其实applyMiddleware这个方法经过调用后所得到的就是一个增强器。为此我们还可以这样调用createStore,并生成store。1
2
3
4
5
6
7....
let enhancer = applyMiddleware(
logger,
thunk
)
let store = createStore(reducer, enhancer)
这种做法跟前面的扩展效果是一样的。
3. 源码分析
1) 中间件原理
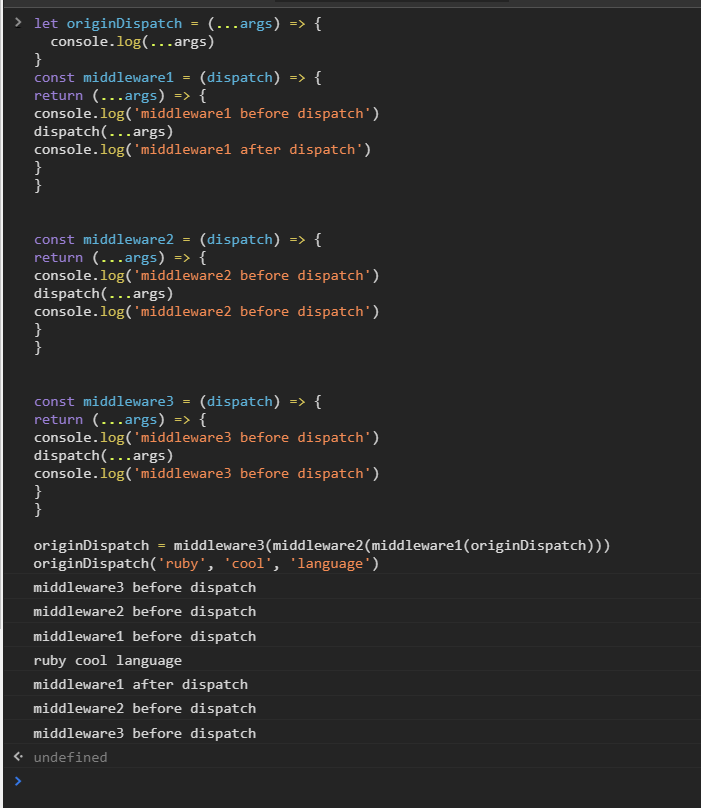
在源码分析之前,先举个例子来看看一个简单的中间件内部应该是什么样子的,我分别定义middleware1,middleware2两个中间件(他们本质是高阶函数),并用来扩展originDispatch函数
let originDispatch = (...args) => {
  console.log(...args)
}

const middleware1 = (dispatch) => {
  return(...args) => {
    console.log('middleware1 before dispatch')
    dispatch(...args)
    console.log('middleware1 after dispatch')
  }
}

const middleware2 = (dispatch) => {
  return(...args) => {
    console.log('middleware2 before dispatch')
    dispatch(...args)
    console.log('middleware2 before dispatch')
  }
}

originDispatch = middleware2(middleware1(originDispatch))
originDispatch('ruby', 'cool', 'language')
结果如下
middleware2 before dispatch
middleware1 before dispatch
ruby cool language
middleware1 after dispatch
middleware2 before dispatch
是不是运行过程是不是有点像洋葱?我们可以使用中间件来对原有的方法进行增强,并返回一个增强了的方法,然后再用另一个中间件来对这个已经增强过的方法再进一步增强,模型示意图如下
2) compose–方法封链辅助函数
从上面的洋葱模型可以看出我们如果要增强一个方法,它的步骤如下
newFunc = f1(f2(func))
可以简单地把f1,f2理解成我们需要各自定义的中间件函数,然而如果我们每次都要手动调用这些方法的话似乎并不太优雅,这个时候可以使用compose函数来完成这种事情。
compose在中文里面是组合的意思,Redux所定义的compose函数可以把函数的参数列表构造成依次调用的形式,并返回一个新的函数。它的源码如下
export default functioncompose(...funcs) {
  ...
  // 以上都是判断
  return funcs.reduce((a, b) => (...args) => a(b(...args)))
}
文字解释可能还不如流程图来得直观,下面简单地分析一下compose(f1, f2, f3, f4)的调用过程
a: f1, b: f2, return: (...args) => f1(f2(...args))
a: (...args) => f1(f2(...args)), b: f3, return: (...args) => f1(f2(f3(...args)))
a: (...args) => f1(f2(f3(...args))), b: f4, return: (...args) => f1(f2(f3(f4(...args))))
把这个方法应用在最初的例子中
> newfunc = compose(middleware2, middleware1)(originDispatch)
[Function]
> newfunc('node', 'good', 'languate')

middleware2 before dispatch
middleware1 before dispatch
node good languate
middleware1 after dispatch
middleware2 before dispatch
结果是一样的。而且从这个例子还可以看出在compose函数的参数列表中越靠后的函数,在构造完成之后,距离原始函数就越近。
3) applyMiddleware–收集中间件,扩展createStore
applyMiddleware.js这个文件里面就包含着它的源码
export default function applyMiddleware(...middlewares) {
  return createStore => (...args) => {
    const store = createStore(...args)
    let dispatch = () => {
      throw new Error(
        `Dispatching while constructing your middleware is not allowed. ` +
          `Other middleware would not be applied to this dispatch.`
      )
    }

    const middlewareAPI = {
      getState: store.getState,
      dispatch: (...args) => dispatch(...args)
    }

    // #1 中间件应该接收store
    const chain = middlewares.map(middleware => middleware(middlewareAPI))

    // #2 返回的函数用于处理dispatch函数
    dispatch = compose(...chain)(store.dispatch)

    // #3 替换dispatchreturn {
      ...store,
      dispatch
    }
  }
}
代码片段#2中我们传入compose函数里的所有函数都是用于扩展dispatch的,这些函数会被定义为这种形式
(dispatch) => {
  return function(...args) {
    // do something before
    dispatch(...args)
    // do something after
  }
}
这些函数会接收一个dispatch方法为参数,并返回一个增强的dispatch方法。然而我们需要编写的中间件却不仅如此,接下来再看看代码片段#1,以及相关的上下文逻辑
export default function applyMiddleware(...middlewares) {
  ....
  const middlewareAPI = {
    getState: store.getState,
    dispatch: (...args) => dispatch(...args)
  }

  // #1 中间件应该接收store
  const chain = middlewares.map(middleware => middleware(middlewareAPI))

  // #2 返回的函数用于处理dispatch函数
  dispatch = compose(...chain)(store.dispatch)
  ...
}
我们通过map方法来处理applyMiddleware所接收的所有中间件,让他们分别以middlewareAPI这个对象作为参数调用过后会返回一个新的函数列表,而这个函数列表才是真正用来增强dispatch的。
middlewareAPI是仅仅包含了getState与dispatch这两个字段的对象,可以把它看成是一个精简版的store。因此我们需要编写的中间件应该是以store作为参数,并且返回一个用于增强dispatch方法的函数,而这个store我们只能够使用getState,dispatch这两个接口。听起来有点拗口,下面我们自行编写一个用于打印状态日志的中间件。
const Logger = (store) => (dispatch) => {
  return function(...args) {
    const wrappedDispatch = store.dispatch
    const getState = store.getState

    console.log('before dispatch', getState())
    dispatch(...args)
    console.log('after dispatch', getState())

    console.info(dispatch)
    console.info(wrappedDispatch)
  }
}
其中dispatch与wrappedDispatch所指代的分发方法是不一样的。
dispatch是从参数中传入,如果当前中间件是第一个对dispatch方法进行增强的中间件,则当前的dispatch所指向的就是Redux原生定义的dispatch方法。如果当前中间件前面已经有若干中间件的调用,则当前dispatch所指代的是经过前面中间件加强过的新的dispatch方法。我们可以来验证一下
let enhancer = applyMiddleware(
  Logger, // 我们自己编写的Logger
  thunk
)
dispatch的打印结果如下
ƒ(action) {
  if (typeof action === 'function') {
    return action(dispatch, getState, extraArgument);
  }

  return next(action);
}
可见,这是一个经过thunk中间件处理后返回的方法。
wrappedDispatch因为匿名函数(...args) => dispatch(...args)的关系,在applyMiddleware函数运行完成并返回之后,匿名函数内部的dispatch会始终指向经过我们增强的dispatch方法。也就是说在中间件里面执行store.dispatch就会始终运行最外层的被增强过的dispatch方法。模型如下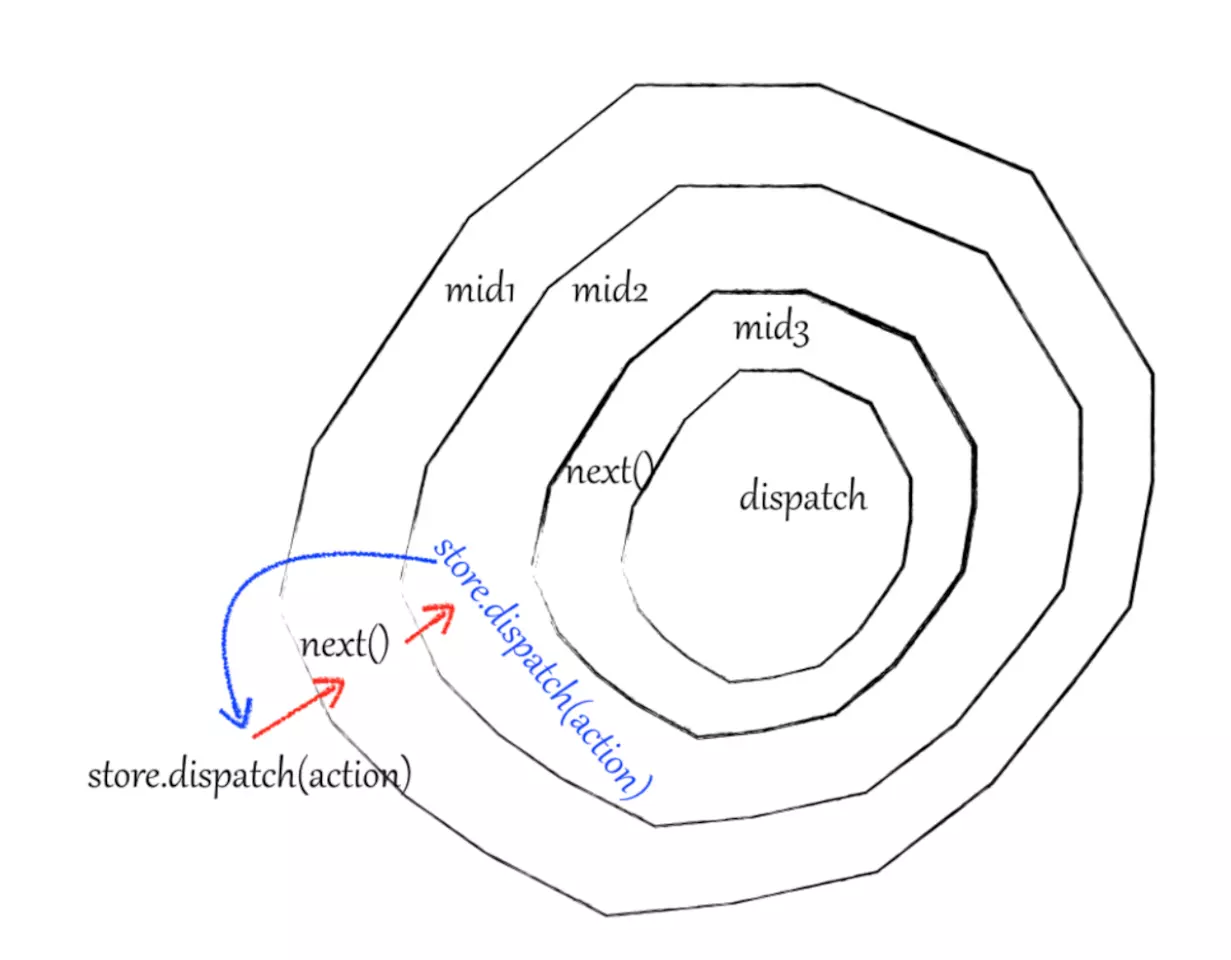
wrappedDispatch打印结果虽然看不出什么,但我也顺手贴一下吧
ƒ dispatch() {
  return _dispatch.apply(undefined, arguments);
}
接下来,我们看applyMiddleware的返回值,它会返回一个新的函数,该函数会以createStore作为参数,处理过后返回一个新的createStore方法,它的模式大概是这样子
(createStore) => (...args) => {

  // createStore方法用来创建store
  return {
    ...
    getState: ...
    dispatch: ...
  }
}
而在applyMiddleware中实际上我们只需要增强dispatch方法,为此我们只需要用新的dispatch方法来替换原来的便可。代码片段#3就是用新的dispatch方法取代原来store中的dispatch方法。
....
    return {
      ...store,
      dispatch
    }
....
1. 模块化reducer
我们写代码的时候也有这种情况当一个文件包含的代码太多的时候我们会考虑按逻辑把它们拆分成几个模块,而当我们遇到一些细粒度同类模块的集合时,则会考虑把他们汇总为一个的模块。至于什么时候该拆,什么时候该合,可能不同的领域自有它的权衡方式。
今天主要谈谈Redux里面如何模块化管理多个reducer函数。在Redux应用里reducer函数可以理解成一个处理状态的函数,它接受一个状态,以及一个动作,处理之后返回一个更新后的状态。一个简单的reducer函数大概如下
function reducerExample(state={}, action) {
  switch (action.type) {
    case'INCREMENT':
      return Object.assign({}, state, {counter: state.counter + 1})
    case'DECREMENT':
      return Object.assign({}, state, {counter: state.counter - 1})
    default:
      return state
  }
}
然而这个函数所包含的逻辑仅仅是对状态的counter字段进行加一以及减一操作。Redux是数据中心,它所管理的状态可能会包含很多个字段,当字段相当多的时候,我们需要在reducerExample函数中定义的操作也会渐渐多起来
function reducerExample(state={}, action) {
  switch (action.type) {
    case'INCREMENT':
      return Object.assign({}, state, {counter: state.counter + 1})
    case'DECREMENT':
      return Object.assign({}, state, {counter: state.counter - 1})
    case'MULTI':
      return Object.assign({}, state, {otherCounter: state.otherCounter * 2})
    ....
    // 此处省略100行代码
    ....
    default:
      return state
  }
}
随着状态越来越多,操作函数也将会越来越复杂,单一的reducer函数并非长久之计。这也是Redux为何提供combineReducers的原因,它使得我们可以以模块的方式来管理多个reducer函数。
简单讲解该函数的使用,假设Redux管理的应用状态如下
{
  counter: 0,
  article: {
    title: "",
    content: ""
  }
}
则我们可以分别定义两个reducer函数counterReducer与articleReducer
function counterReducer(counter=0, action) {
  ...
}


function articleReducer(article={}, action) {
  ...
}
在counterReducer里面只定义与counter字段有关的数据操作,而在articleReducer里面只定义与article字段有关的数据操作,最后通过combineReducers来合并两个reducer函数,并生成新的函数reducer,我们只需要把这个新的函数reducer与系统进行集成即可。
const reducer = combineReducers({
  counter: counterReducer,
  article: articleReducer
})
我们甚至可以把counterReducer与articleReducer两个函数放在不同的文件中,然后在同一个地方汇总(通过combineReducers)。当我们分发指定的动作之后只有定义了该动作的函数会改变它所对应字段的状态信息。
2. 源码分析
接下来分析一下combineReducers函数的工作原理。combineReducers.js这个文件代码加注释大概100多行,然而我们真正需要了解的核心就仅仅是该脚本中需要导出的combineReducers这个函数,其他代码大多是用于断言,暂且略过不谈。
1) 收集reducers
我们都知道函数接收对象的每个键所对应的值都应该是一个可以用于改变状态的reducer函数,为此我们会先遍历combineReducers函数所接收的对象,排除其中不是函数的字段。
export default function combineReducers(reducers) {
  const reducerKeys = Object.keys(reducers)
  const finalReducers = {}
  for (let i = 0; i < reducerKeys.length; i++) { // #1
    const key = reducerKeys[i]

    ....

    if (typeof reducers[key] === 'function') { // #2
      finalReducers[key] = reducers[key]
    }
  }

  ......
}
代码片段#1遍历函数接收的对象的所有键,代码片段#2判断该键在原对象中指向的内容是否是一个函数。如果是函数的话,则把该函数以同样的键存储到finalReducers这个对象中,等循环结束以后finalReducers对象的每一个键所对应的值则都是一个函数了。
2) 返回一个新的reducer函数
combineReducers其实是一个reducer函数的工厂,在收集不同模块的reducer函数之后,它的责任就是返回一个新的reducer,而这个新的reducer函数能够调度先前收集的所有reducer。我把后续源码中的断言都去掉之后就剩下下列代码
export default function combineReducers(reducers) {
  ...

  const finalReducerKeys = Object.keys(finalReducers) // # 1
    return function combination(state = {}, action) {
    .....

    let hasChanged = false
    const nextState = {}
    for (let i = 0; i < finalReducerKeys.length; i++) {
      const key = finalReducerKeys[i]
      const reducer = finalReducers[key] // #2
      const previousStateForKey = state[key] // #3
      const nextStateForKey = reducer(previousStateForKey, action) // #4
      ....
      nextState[key] = nextStateForKey
      hasChanged = hasChanged || nextStateForKey !== previousStateForKey
    }
    return hasChanged ? nextState : state
  }
}
首先会在代码片段#1获取先前过滤好的finalReducers对象的所有键,并存储到finalReducerKeys中。然后当前函数会返回一个新的reducer函数,这个函数能够访问finalReducers形成一个闭包。
当调用这个新的reducer函数的时,它会遍历finalReducerKeys这个数组中的每一个键,在代码#2处获取当前键所对应的reducer函数并存储到常量reducer,然后在代码#3处获取当前键所对应的状态previousStateForKey。
接下来在代码#4处以当前状态previousStateForKey以及action作为参数来调用reducer函数,返回该键所对应的新状态nextStateForKey。在每次迭代中都会把当前键key作为字段,把新的状态存储到nextState这个对象中去,循环结束之后,我们就能够保证action被充分调度了。
另外,还记得咱门编写reducer函数的时候会经常使用这种语法吗?
Object.assign({}, state, {counter: state.counter + 1})
这表明了我们不会在原来的state基础上进行修改操作,而是生成了一个新的state,原理大概如下
> a = {}
{}
> b = Object.assign(a, {counter: 1})
{ counter: 1 }
> c = Object.assign({}, a, {counter: 1})
{ counter: 1 }
> a === b
true
> a === c
false
而在Redux中,正常情况下如果reducer方法被调用后并没有产生新的对象,而只是在原有的对象中进行操作的话,则在绑定组件的时候,状态的修改将有可能不会引起组件的更新。reducer函数的定位是纯函数,不应该造成任何副作用,为此,reducer函数都应该要生成新的对象。
在combineReducers这个函数里也会有相应的处理,这里需要着重关注hasChanged这个变量
...
  return hasChanged ? nextState : state
...
当且仅当,这个变量为真值的时候我们才会返回新的状态,不然的话依旧返回原有的状态。这个hasChanged是由以下代码控制的
...
for (let i = 0; i < finalReducerKeys.length; i++) {
  ....
  hasChanged = hasChanged || nextStateForKey !== previousStateForKey
}
也就是说在所有的迭代中至少有一次迭代符合nextStateForKey !== previousStateForKey这个条件的时候(所对应的reducer返回了新的对象)hasChanged才会为真,新的reducer函数才会返回新的状态对象nextState。否则将返回原有的状态对象state,这样在绑定React组件的时候则有可能会出现状态数据更新了,组件却没有响应的情况。
为什么Redux 需要 reducers是纯函数?
1. ActionCreator创建动作
在深入分析源码之前我们先来聊聊ActionCreator。从字面上理解,它是一个动作的创造者,或者说是动作的工厂。如果我们想根据不同的参数来生成不同步长的计数器动作,则可以把工厂函数声明为
const counterIncActionCreator = function(step) {
  return {
    type: 'INCREMENT',
    step: step || 1
  }
}
随着业务逻辑越来越复杂,我们可以通过定义更加复杂的工厂函数来生成更多样化的动作类型。
2. bindActionCreator高阶函数
从上述的例子出发,如果我们想生产出不同步长的计数器动作,并分发他们,则需要把代码写成下面这样子
// 为了简化代码我把dispatch函数定义为只有打印功能的函数
const dispatch = function(action) {
  console.log(action)
}

const action1 = counterIncActionCreator()
dispatch(action1) // { type: 'INCREMENT', step: 1 }

const action2 = counterIncActionCreator(2)
dispatch(action2) // { type: 'INCREMENT', step: 2 }

const action3 = counterIncActionCreator(3)
dispatch(action3) // { type: 'INCREMENT', step: 3 }
可见每次分发动作之前我们都得手动调用counterIncActionCreator来生产相应的动作,这种方式并不是那么的优雅。这个时候我们就可以采用bindActionCreators这个文件里面的bindActionCreator工具函数来优化代码了,该函数的源码如下
function bindActionCreator(actionCreator, dispatch) {
  return function() {
    return dispatch(actionCreator.apply(this, arguments))
  }
}
bindActionCreator将会返回一个新函数,这个函数会用自身所接收的参数来调用actionCreator并生成对应动作,并且这个生成的动作将会作为dispatch函数的参数。也就是说我们把
- 生成动作
- 调度动作
这两个步骤都封装到一个函数里面了,于是便得到了更为优雅的调度过程
...
const increment = bindActionCreator(counterIncActionCreator, dispatch)

increment() // { type: 'INCREMENT', step: 1 }

increment(2) // { type: 'INCREMENT', step: 2 }

increment(3) // { type: 'INCREMENT', step: 3 }
3. bindActionCreators
接下来看看bindActionCreators这个函数,它是bindActionCreator函数的加强版。删掉一些断言语句之后源码如下
export default functionbindActionCreators(actionCreators, dispatch) {
  if (typeof actionCreators === 'function') { // #1
     return bindActionCreator(actionCreators, dispatch) // #2
  }

  ....

  const keys = Object.keys(actionCreators)
  const boundActionCreators = {}
  for (let i = 0; i < keys.length; i++) {
    const key = keys[i]
    const actionCreator = actionCreators[key]
    if (typeof actionCreator === 'function') { // #3
      boundActionCreators[key] = bindActionCreator(actionCreator, dispatch)
    }
  }
  return boundActionCreators
}
代码#1的判断语句是为了做兼容处理,当接收的参数actionCreators为一个函数的时候,则认为它是单一的动作工厂,便在代码#2处直接调用bindActionCreator工具函数来封装调度过程。
另一情况是当actionCreators参数是一个对象的时候,则遍历这个对象。代码#3会判断每个键在原始对象中的值是否是个函数,如果是一个函数则认为它是一个动作工厂,并使用bindActionCreator函数来封装调度过程,最后把生成的新函数以同样的键key存储到boundActionCreators对象中。在函数的末尾会返回boundActionCreators对象。
举个简单应用例子,首先使用一个对象来存储两个事件工厂
const MyActionCreators = {
  increment: function(step) {
    return {
      type: 'INCREMENT',
      step: step || 1
    }
  },

  decrement: function(step) {
    return {
      type: 'DECREMENT',
      step: - (step || 1)
    }
  }
}
然后通过bindActionCreators来封装调度过程,并返回一个新的对象
const dispatch = function(action) {
  console.log(action)
}

const MyNewActionCreators = bindActionCreators(MyActionCreators, dispatch)
最后我们便可以用新的对象来主导调度过程了
MyNewActionCreators.increment() // { type: 'INCREMENT', step: 1 }
MyNewActionCreators.increment(2) // { type: 'INCREMENT', step: 2 }
MyNewActionCreators.increment(3) // { type: 'INCREMENT', step: 3 }
MyNewActionCreators.decrement() // { type: 'DECREMENT', step: -1 }
MyNewActionCreators.decrement(2) // { type: 'DECREMENT', step: -2 }
MyNewActionCreators.decrement(3) // { type: 'DECREMENT', step: -3 }
这种调度方式显然比原始的依次调用的方式更为优雅
// 原始的调度方式
dispatch(MyActionCreators.increment()) // { type: 'INCREMENT', step: 1 }
dispatch(MyActionCreators.increment(2)) // { type: 'INCREMENT', step: 2 }
dispatch(MyActionCreators.increment(3)) // { type: 'INCREMENT', step: 3 }
dispatch(MyActionCreators.decrement()) // { type: 'DECREMENT', step: -1 }
dispatch(MyActionCreators.decrement(2)) // { type: 'DECREMENT', step: -2 }
dispatch(MyActionCreators.decrement(3)) // { type: 'DECREMENT', step: -3 }
重点说说redux middleware
middleware 的由来
在业务中需要打印每一个 action 信息来调试,又或者希望 dispatch 或 reducer 拥有异步请求的功能。面对这些场景时,一个个修改 dispatch 或 reducer 代码有些乏力,我们需要一个可组合的、自由增减的插件机制,Redux 借鉴了 Koa 中 middleware 的思想,利用它我们可以在前端应用中便捷地实现如日志打印、异步请求等功能。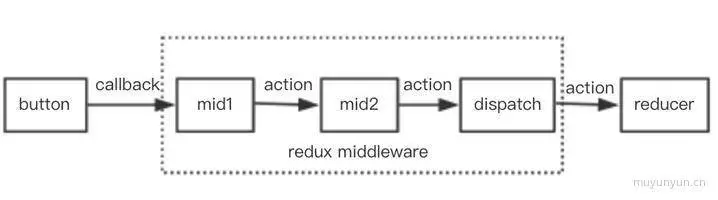
比如在项目中,进行了如下调用后,redux 就集成了 thunk 函数调用以及打印日志的功能。
import thunk from'redux-thunk'
import logger from'../middleware/logger'
const enhancer = applyMiddleware(thunk, logger),  // 以 redux-thunk、logger 中间件为例介绍中间件的使用
const store = createStore(rootReducer, enhancer)
下面追本溯源,来分析下源码。
applyMiddleware 调用入口
export default function createStore(reducer, preloadedState, enhancer) {
  // 通过下面代码可以发现,如果 createStore 传入 2 个参数,第二个参数相当于就是 enhancer
  if (typeof preloadedState === 'function' && typeof enhancer === 'undefined') {
    enhancer = preloadedState
    preloadedState = undefined
  }
  if (typeof enhancer !== 'undefined') {
    return enhancer(createStore)(reducer, preloadedState)
  }
  ...
}
由上述 createStore 发现,applyMiddleware 会进行 applyMiddleware(thunk, logger)(createStore)(reducer, preloadedState) 的调用。
applyMiddleware 源码 如下
export default function applyMiddleware(...middlewares) {
  return createStore => (...args) => {
    const store = createStore(...args)
    let dispatch = store.dispatch
    let chain = []

    const middlewareAPI = {
      getState: store.getState,                // 调用 redux 原生方法,获取状态
      dispatch: (...args) => dispatch(...args) // 调用 redux 原生 dispatch 方法
    }
    // 串行 middleware
    chain = middlewares.map(middleware => middleware(middlewareAPI))
    dispatch = compose(...chain)(store.dispatch)

    return {
      ...store,
      dispatch // 返回加工过的 dispatch
    }
  }
}
可以发现 applyMiddleware 的作用其实就是返回加工过的 dispatch,下面会着重分析 middlewares 是如何串行起来的以及 dispatch 是如何被加工的。
串行 middleware
const middlewareAPI = {
  getState: store.getState,
  dispatch: (...args) => dispatch(...args)
}
chain = middlewares.map(middleware => middleware(middlewareAPI))
dispatch = compose(...chain)(store.dispatch)
观察上述代码后发现每个 middleware 都会传入参数 middlewareAPI,来看下中间件 logger 的源码 以及 redux-thunk 的源码, 发现中间件接受的第一个参数正是 ({ dispatch, getState })
// logger 源码
export default ({ dispatch, getState }) => next => action => {
  console.log(action)
  return next(action) // 经 compose 源码分析,此处 next 为 Store.dispatch
}


// redux-thunk 源码
export default ({ dispatch, getState }) => next => action => {
  if (typeof action === 'function') {
    return action(dispatch,getState);
  }
  //这里可以理解为dispatch(action),本质上就是调用 middleware 链中下一个 middleware 的 dispatch。
  return next(action) // 此处 next 为 logger 中间件返回的 (action) => {} 函数
}

//使用redux-thunk
const store = createStore(
  reducer,
  applyMiddleware(thunk)
);

//然后我们实现一个thunkActionCreator
//过一秒加1
export function thunkActionCreator(payload){
    return function(dispatch,getState){
        setTimeout(function(){
            dispatch({type:types.INCREMENT,payload:payload});
        },1000);
    }
},

//最后,在组件中dispatch thunk
this.dispatch(thunkActionCreator(payload));


DEMO:
export const getNav = () => async (dispatch, getState) => {
    try {
        let response = await instance.get(`book/navigation`)
        await dispatch(receiveNav(response.data))
    } catch (error) {
        console.log('error: ', error)
    }
  }
dispatch 是如何被加工的
接着上个小节,在 dispatch = compose(...chain)(store.dispatch) 中发现了 compose 函数,来看下 compose 的源码
export default function compose(...funcs) {
  // ...
  return funcs.reduce((a, b) => (...args) => a(b(...args)))
}
compose 源码中的 funcs.reduce((a, b) => (...args) => a(b(...args))) 算是比较重要的一句,它的作用是返回组合参数后的函数,比如 compose(f, g, h) 等价于 (…args) => f(g(h(…args))),效果图如下所示,调用 this.props.dispatch() 后,会调用相应的中间件,最终会调用 redux 原生的 store.dispatch(),并且可以看到中间件调用的形式类似数据结构中的栈(先进后出)。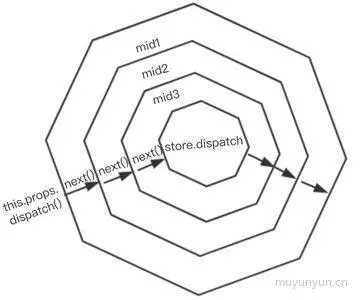
拿上个小节提到的 logger、redux-thunk 中间件为例,其 middleware 的内部串行调用方式如下,从而完成了 dispatch 功能的增强(支持如 this.props.dispatch(func) 的调用以及日志功能)。具体可以看 项目中的运用
action => {
  if (typeof action === 'function') {
    return action(dispatch)
  }
  return (action => {
    console.log(action)
    return store.dispatch(action)
  })(action)
}
redux-promise
redux-promise也是延迟执行的表达式,它是解决异步的另外一种方案。
redux-thunk和核心思想是把action变成thunk,而redux-promise的核心思想是让action返回一个promise对象。
这个中间件使得store.dispatch方法可以接收Promise对象作为参数。这时 ,action 有两种写法:
写法一、返回值是一个Promise对象。1
2
3
4
5
6
7
8function promiseIncrement(payload){
// return {type:types.INCREMENT,payload:payload} 以前是这种写法
return new Promise(function(resolve,reject){
setTimeout(function(){
resolve({type:types.INCREMENT,payload:payload});
},1000);
});
},
写法二,action 对象的payload属性是一个Promise对象,这需要从1
2
3
4
5
6
7
8
9
10
11
12
13
14function payloadIncrement(){
return {
type:types.INCREMENT,
payload: new Promise(function(resolve,reject){
setTimeout(function(){
if(Math.random()>.5){
resolve(100);
}else{
reject(-100);
}
},1000)
})
}
}
下面我们来看看 redux-promise是怎么实现的,就会明白它内部是怎么操作的.1
2
3
4
5
6
7
8
9
10let promise = ({dispatch,getState})=>next=>action=>{
if(action.then && typeof action.then == 'function'){
action.then(dispatch);
// 这里的dispatch就是一个函数,dispatch(action){state:reducer(state,action)};
}else if(action.payload&& action.payload.then&& typeof action.payload.then == 'function'){
action.payload.then(payload=>dispatch({...action,payload}),payload=>dispatch({...action,payload}));
}else{
next(action);
}
}
上面的代码可以看出,如果Action本身就是一个Promise,它resolve以后的值应该是一个Action对象,会被dispatch方法送出action.then(dispatch);如果Action对象的 payload属性是一个Promise对象,那么无论resolve和reject,dispatch 方法都会发出Action。
理解 funcs.reduce((a, b) => (args) => a(b(args)))
1 | <!DOCTYPE html> |
compose(middleware2, middleware1)返回(args) => middleware2(middleware1(args));compose(middleware2, middleware1)(originDispatch)返回middleware2(middleware1(originDispatch))- 将
middleware1(originDispatch)当做一个整体,middleware2(middleware1(originDispatch))中的middleware2返回一个函数,等着接受...args;当compose(middleware2, middleware1)(originDispatch)('redux', 'is', 'cool'),...args为('redux', 'is', 'cool')。