参考文章:IntersectionObserver API 使用教程
Intersection Observer
【译】使用 Intersection Observer 实现图片延迟加载
intersectionObserver解决什么问题?
intersectionObserver解决目标元素与视口产生一个交叉区,所以这个 API 叫做”交叉观察器”,
比如在web网页开发中,常常需要了解某个元素是否进入了”视口”(viewport),即用户能不能看到它。
传统的实现方法是,监听到scroll事件后,调用目标元素(绿色方块)的getBoundingClientRect()方法,得到它对应于视口左上角的坐标,再判断是否在视口之内。这种方法的缺点是,由于scroll事件密集发生,计算量很大,容易造成性能问题。
目前有一个新的 IntersectionObserver API,可以自动”观察”元素是否可见,Chrome 51+ 已经支持。由于可见(visible)的本质是,目标元素与视口产生一个交叉区,所以这个 API 叫做”交叉观察器”。
IntersectionObserver API 是异步的,不随着目标元素的滚动同步触发。规格写明,
IntersectionObserver的实现,应该采用requestIdleCallback(),即只有线程空闲下来,才会执行观察器。这意味着,这个观察器的优先级非常低,只在其他任务执行完,浏览器有了空闲才会执行。
IntersectionObserverEntry 对象
IntersectionObserverEntry对象提供目标元素的信息,一共有六个属性。
{
  time: 3893.92,
  rootBounds: ClientRect {
    bottom: 920,
    height: 1024,
    left: 0,
    right: 1024,
    top: 0,
    width: 920 },
  boundingClientRect: ClientRect {  // ...
 },
  intersectionRect: ClientRect {  // ...
 },
  intersectionRatio: 0.54,
  target: element
}
每个属性的含义如下。
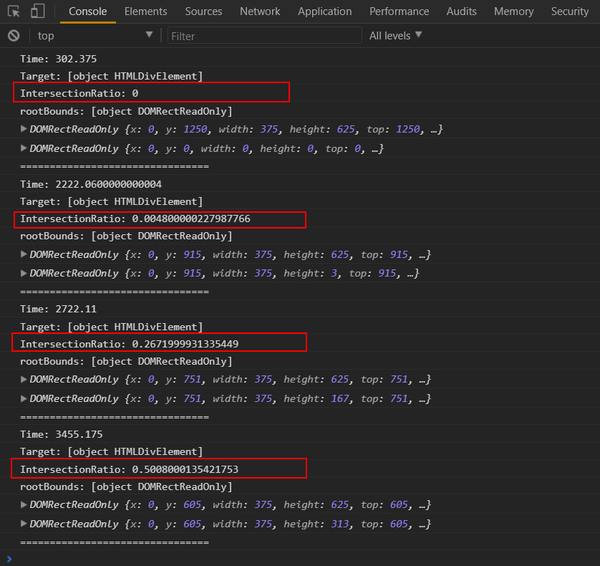
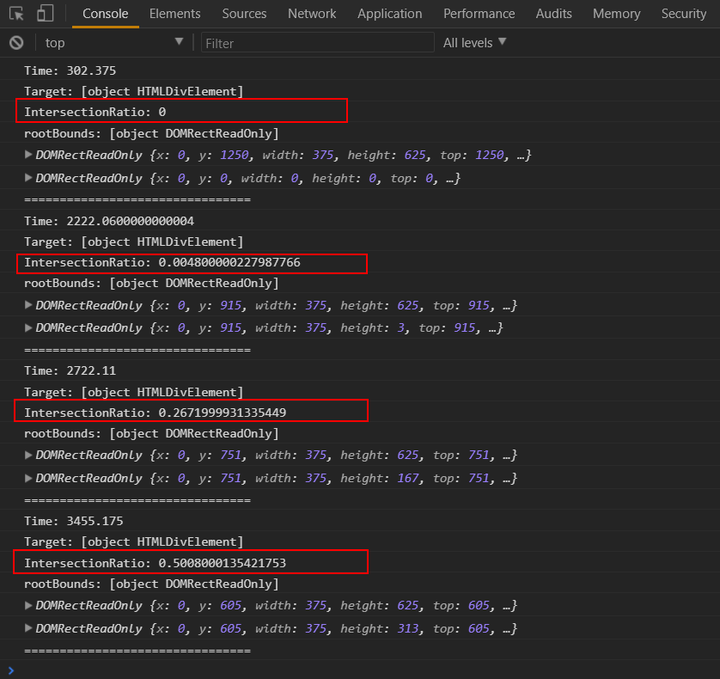
time:可见性发生变化的时间,是一个高精度时间戳,单位为毫秒target:被观察的目标元素,是一个 DOM 节点对象rootBounds:根元素的矩形区域的信息,getBoundingClientRect()方法的返回值,如果没有根元素(即直接相对于视口滚动),则返回nullboundingClientRect:目标元素的矩形区域的信息intersectionRect:目标元素与视口(或根元素)的交叉区域的信息intersectionRatio:目标元素的可见比例,即intersectionRect占boundingClientRect的比例,完全可见时为1,完全不可见时小于等于0
现在我们已经创建了一个 Intersection Observer 并且正在观察页面上的图片,我们现在来了解 intersection 事件,它将在元素进入视区时触发。
浏览器支持
此时此刻,你也许想知道关于这项特性的浏览器支持情况。Intersection Observer 现在已被 Edge、Firefox、Chrome 和 Opera 支持,这是一个好消息。
然而,为了确保我们的代码不会在不支持它的浏览器中造成破坏,我们可以使用特性检测来确定我们应该如何来加载图片。让我们看看下面的代码。
// If we don't have support for intersection observer, load the images immediately
if (!('IntersectionObserver' in window)) {
  Array.from(images).forEach(image => preloadImage(image));
} else {
  // It is supported, load the images
  observer = new IntersectionObserver(onIntersection, config);
  images.forEach(image => {

   observer.observe(image);
  });
}
view raw
Vue:
<template>
    <img :src="lazysrc" />
</template>
<script>
    import Bus from '../bus';
    import nonepng from '../../assets/img/none.png';

    export default {
        name: 'lazyimg',
        data: function() {
            return {
                isShow: false,
                lazysrc: nonepng
            }
        },
        mounted() {
            if(!this.needlazy) {
                this.lazysrc = this.src;
            } else {
                if(!('IntersectionObserver' in window)) {
                    //TODO
                } else {
                    var io = new IntersectionObserver(
                        entries => {
                            entries.forEach(i => {
                                if(i.intersectionRatio >= 0.25) { //可见元素占视窗的25%触发
                                    i.target.setAttribute("src", this.src)
                                }
                            });
                        }, {
                            threshold: [0, 0.25, 0.5, 0.75, 1],
                        }
                    );
                    io.observe(this.$el);
                }
            }
        },
        props: {
            needlazy: {
                type: Boolean,
                default: false,
            },
            src: {
                type: String,
                default: '',
            },
        }
    };
</script>
通常都是通过判断intersectionRatio来做某些事,比如当intersectionRatio大于多少的时候做什么事,加载图片等!

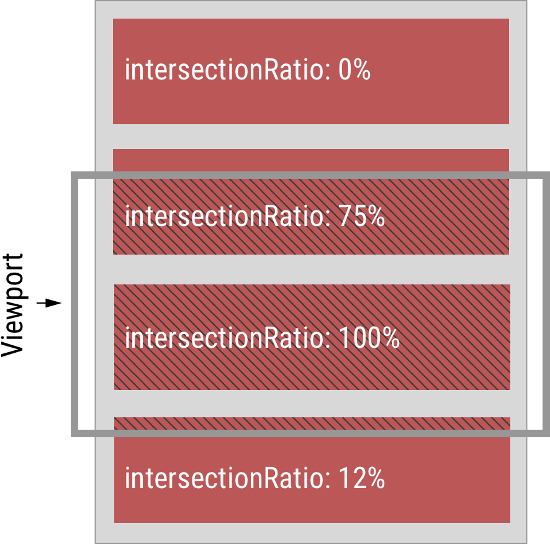
灰色的水平方框代表视口,深红色的区域代表四个被观察的目标元素。它们各自的intersectionRatio图中都已经注明。
DEMO: 延迟加载(Lazyload)三种实现方式
<!DOCTYPE html>
<html>

    <head>
        <meta charset="utf-8">
        <meta name="viewport" content="width=device-width">
        <title> </title>
        <style type="text/css">
            * {
                padding: 0px;
                margin: 0px;
                outline: none;
            }

            body {}

            #main {
                margin: 0 auto;
                width: 600px;
                height: 300px;
                overflow: scroll;
            }

            #con {
                width: 1200px;
                height: 300px;
            }

            .cc {
                width: 300px;
                height: 300px;
                float: left;
                background-size: cover;
            }

            #a {
                background-color: red;
            }

            #b {
                background-color: black;
            }

            #c {
                background-color: blue;
            }

            #d {
                background-color: green;
            }
        </style>
    </head>

    <body>
        <div id="main">
            <div id="con">
                <div id="a" class="cc"></div>
                <div id="b" class="cc"></div>
                <div id="c" class="cc"></div>
                <div id="d" class="cc"></div>
            </div>
        </div>
    </body>
    <script type="text/javascript">
        var io = new IntersectionObserver(
            entries => {
                console.log('********************************');
                console.log(entries);
                console.log('********************************');
                entries.forEach(i => {
                    console.log('================================');
                    console.log('Time: ' + i.time);
                    console.log('Target: ' + i.target.nodeName);
                    console.log('IntersectionRatio: ' + i.intersectionRatio);
                    console.log('rootBounds: ' + i.rootBounds);
                    console.log(i.boundingClientRect);
                    console.log(i.intersectionRect);
                    console.log('================================');

                    if(i.intersectionRatio >= 0.25) { //可见元素占视窗的25%触发
                        console.log('^^^^^^^^^^^^^^^^^^^^^^^^^^^^^^^^');
                        i.target.style.backgroundImage = "url(" + 'http://pic35.photophoto.cn/20150528/0020032932102307_b.jpg' + ")"
                    }

                });
            }, {
                /* Using default options. Details below */
                threshold: [0, 0.25, 0.5, 0.75, 1],   //会执行5次
            }
        );
        // Start observing an element
        io.observe(document.querySelector('#d'));
        io.observe(document.querySelector('#c'));
    </script>

</html>
<!DOCTYPE html>
<html lang="en">
<head>
    <meta charset="UTF-8">
    <title>Lazyload 3</title>
    <style>
        img {
        display: block;
        margin-bottom: 50px;
        width: 800px;
        }
    </style>
</head>
<body>
    <img src="images/loading.gif" data-src="images/1.png">
    <img src="images/loading.gif" data-src="images/2.png">
    <img src="images/loading.gif" data-src="images/3.png">
    <img src="images/loading.gif" data-src="images/4.png">
    <img src="images/loading.gif" data-src="images/5.png">
    <img src="images/loading.gif" data-src="images/6.png">
    <img src="images/loading.gif" data-src="images/7.png">
    <img src="images/loading.gif" data-src="images/8.png">
    <img src="images/loading.gif" data-src="images/9.png">
    <img src="images/loading.gif" data-src="images/10.png">
    <img src="images/loading.gif" data-src="images/11.png">
    <img src="images/loading.gif" data-src="images/12.png">
    <script>
    function query(selector) {
        return Array.from(document.querySelectorAll(selector));
    }
    var io = new IntersectionObserver(function(items) {
        items.forEach(function(item) {
        var target = item.target;
        if(target.getAttribute('src') == 'images/loading.gif') {
            target.src = target.getAttribute('data-src');
        }
        })
    });
    query('img').forEach(function(item) {
        io.observe(item);
    });
    </script>
</body>
</html>
- IntersectionObserver 传入一个回调函数,当其观察到元素集合出现时候,则会执行该函数。
- io.observe 即要观察的元素,要一个个添加才可以。
- io 管理的是一个数组,当元素出现或消失的时候,数组添加或删除该元素,并且执行该回调函数。
一、API
它的用法非常简单。
var io = new IntersectionObserver(callback, option);
上面代码中,IntersectionObserver是浏览器原生提供的构造函数,接受两个参数:callback是可见性变化时的回调函数,option是配置对象(该参数可选)。
构造函数的返回值是一个观察器实例。实例的observe方法可以指定观察哪个 DOM 节点。
// 开始观察
io.observe(document.getElementById('example'));
// 停止观察
io.unobserve(element);
// 关闭观察器
io.disconnect();
上面代码中,observe的参数是一个 DOM 节点对象。如果要观察多个节点,就要多次调用这个方法。
io.observe(elementA);
io.observe(elementB);
二、callback 参数
目标元素的可见性变化时,就会调用观察器的回调函数callback。
callback一般会触发两次。一次是目标元素刚刚进入视口(开始可见),另一次是完全离开视口(开始不可见)。
var io = new IntersectionObserver(
  entries => {
    console.log(entries); }
);
上面代码中,回调函数采用的是箭头函数的写法。callback函数的参数(entries)是一个数组,每个成员都是一个[IntersectionObserverEntry](https://link.zhihu.com/?target=https%3A//developer.mozilla.org/en-US/docs/Web/API/IntersectionObserverEntry)对象。举例来说,如果同时有两个被观察的对象的可见性发生变化,entries数组就会有两个成员。
三、Option 对象
IntersectionObserver构造函数的第二个参数是一个配置对象。它可以设置以下属性。
[IntersectionObserver.root](https://link.zhihu.com/?target=https%3A//developer.mozilla.org/zh-CN/docs/Web/API/IntersectionObserver/root) 只读所监听对象的具体祖先元素([element](https://link.zhihu.com/?target=https%3A//developer.mozilla.org/zh-CN/docs/Web/API/Element))。如果未传入任何值或值为null,则默认使用viewport。
[IntersectionObserver.rootMargin](https://link.zhihu.com/?target=https%3A//developer.mozilla.org/zh-CN/docs/Web/API/IntersectionObserver/rootMargin) 只读计算交叉时添加到根(root)边界盒bounding box的矩形偏移量, 可以有效的缩小或扩大根的判定范围从而满足计算需要。此属性返回的值可能与调用构造函数时指定的值不同,因此可能需要更改该值,以匹配内部要求。所有的偏移量均可用像素(pixel)(px)或百分比(percentage)(%)来表达, 默认值为”0px 0px 0px 0px”。
[IntersectionObserver.thresholds](https://link.zhihu.com/?target=https%3A//developer.mozilla.org/zh-CN/docs/Web/API/IntersectionObserver/thresholds) 只读一个包含阈值的list, 升序排列, list中的每个阈值都是监听对象的交叉区域与边界区域的比率。当监听对象的任何阈值被越过时,都会生成一个通知(Notification)。如果构造器未传入值, 则默认值为0.
threshold 属性
threshold属性决定了什么时候触发回调函数。它是一个数组,每个成员都是一个门槛值,默认为[0],即交叉比例(intersectionRatio)达到0时触发回调函数。
new IntersectionObserver(
  entries => {/* ... */}, {
    threshold: [0, 0.25, 0.5, 0.75, 1] } );
用户可以自定义这个数组。比如,[0, 0.25, 0.5, 0.75, 1]就表示当目标元素 0%、25%、50%、75%、100% 可见时,会触发回调函数。
root 属性,rootMargin 属性
很多时候,目标元素不仅会随着窗口滚动,还会在容器里面滚动(比如在iframe窗口里滚动)。容器内滚动也会影响目标元素的可见性,参见本文开始时的那张示意图。
IntersectionObserver API 支持容器内滚动。root属性指定目标元素所在的容器节点(即根元素)。注意,容器元素必须是目标元素的祖先节点。
var opts = {
  root: document.querySelector('.container'),
  rootMargin: "500px 0px"
};

var observer = new IntersectionObserver(
  callback,
  opts
);
上面代码中,除了root属性,还有[rootMargin](https://link.zhihu.com/?target=https%3A//wicg.github.io/IntersectionObserver/%23dom-intersectionobserverinit-rootmargin)属性。后者定义根元素的margin,用来扩展或缩小rootBounds这个矩形的大小,从而影响intersectionRect交叉区域的大小。它使用CSS的定义方法,比如10px 20px 30px 40px,表示 top、right、bottom 和 left 四个方向的值。
//离视窗还有top=500px 或者 bottom=500 触发加载
rootMargin = `500px 0px`
//离视窗还有top=-500px 或者 bottom=-500 触发加载 (惰性加载)
rootMargin = `-500px 0px`
这样设置以后,不管是窗口滚动或者容器内滚动,只要目标元素可见性变化,都会触发观察器。
四、方法
[IntersectionObserver.disconnect](https://link.zhihu.com/?target=https%3A//developer.mozilla.org/zh-CN/docs/Web/API/IntersectionObserver/disconnect)使IntersectionObserver对象停止监听工作。
[IntersectionObserver.observe](https://link.zhihu.com/?target=https%3A//developer.mozilla.org/zh-CN/docs/Web/API/IntersectionObserver/observe)使IntersectionObserver开始监听一个目标元素。
[IntersectionObserver.takeRecords](https://link.zhihu.com/?target=https%3A//developer.mozilla.org/zh-CN/docs/Web/API/IntersectionObserver/takeRecords)为所有监听目标返回一个[IntersectionObserverEntry](https://link.zhihu.com/?target=https%3A//developer.mozilla.org/zh-CN/docs/Web/API/IntersectionObserverEntry)对象数组并且停止监听这些目标。
[IntersectionObserver.unobserve](https://link.zhihu.com/?target=https%3A//developer.mozilla.org/zh-CN/docs/Web/API/IntersectionObserver/unobserve)使IntersectionObserver停止监听特定目标元素。
五、Vue(xunleif2e/vue-lazy-component)
核心 VueLazyComponent.vue
<template>
  <transition-group :tag="tagName" name="lazy-component" style="position: relative;"
    @before-enter="(el) => $emit('before-enter', el)"
    @before-leave="(el) => $emit('before-leave', el)"
    @after-enter="(el) => $emit('after-enter', el)"
    @after-leave="(el) => $emit('after-leave', el)"
  >
    <div v-if="isInit" key="component">
      <slot :loading="loading"></slot>
    </div>
    <div v-else-if="$slots.skeleton" key="skeleton">
      <slot name="skeleton"></slot>
    </div>
    <div v-else key="loading">
    </div>
  </transition-group>
</template>

<script>
  export default {
    name: 'VueLazyComponent',

    props: {
      timeout: {
        type: Number
      },
      tagName: {
        type: String,
        default: 'div'
      },
      viewport: {
        type: typeof window !== 'undefined' ? window.HTMLElement : Object,
        default: () => null
      },
      threshold: {
        type: String,
        default: '0px'
      },
      direction: {
        type: String,
        default: 'vertical'
      },
      maxWaitingTime: {
        type: Number,
        default: 50
      }
    },

    data () {
      return {
        isInit: false,
        timer: null,
        io: null,
        loading: false
      }
    },

    created () {
      // 如果指定timeout则无论可见与否都是在timeout之后初始化
      if (this.timeout) {
        this.timer = setTimeout(() => {
          this.init()
        }, this.timeout)
      }
    },

    mounted () {
      if (!this.timeout) {
        // 根据滚动方向来构造视口外边距,用于提前加载
        let rootMargin
        switch (this.direction) {
          case 'vertical':
            rootMargin = `${this.threshold} 0px`
            break
          case 'horizontal':
            rootMargin = `0px ${this.threshold}`
            break
        }

        // 观察视口与组件容器的交叉情况
        this.io = new window.IntersectionObserver(this.intersectionHandler, {
          rootMargin,
          root: this.viewport,
          threshold: [ 0, Number.MIN_VALUE, 0.01]
        })
        this.io.observe(this.$el)
      }
    },

    beforeDestroy () {
      // 在组件销毁前取消观察
      if (this.io) {
        this.io.unobserve(this.$el)
      }
    },

    methods: {
      // 交叉情况变化处理函数
      intersectionHandler (entries) {
        if (
          // 正在交叉
          entries[0].isIntersecting ||
          // 交叉率大于0
          entries[0].intersectionRatio
        ) {
          this.init()
          this.io.unobserve(this.$el)
        }
      },

      // 处理组件和骨架组件的切换
      init () {
        // 此时说明骨架组件即将被切换
        this.$emit('beforeInit')
        this.$emit('before-init')

        // 此时可以准备加载懒加载组件的资源
        this.loading = true

        // 由于函数会在主线程中执行,加载懒加载组件非常耗时,容易卡顿
        // 所以在requestAnimationFrame回调中延后执行
        this.requestAnimationFrame(() => {
          this.isInit = true
          this.$emit('init')
        })
      },

      requestAnimationFrame (callback) {
        // 防止等待太久没有执行回调
        // 设置最大等待时间
        setTimeout(() => {
          if (this.isInit) return
          callback()
        }, this.maxWaitingTime)

        // 兼容不支持requestAnimationFrame 的浏览器
        return (window.requestAnimationFrame || ((callback) => setTimeout(callback, 1000 / 60)))(callback)
      }
    }
  }
</script>