写在前面
css博大精深,很多属性,往往都是看似熟悉,但是似乎又不能将其特性和用法完整地说出来。
content属性,的确是很眼熟,也许很多童鞋和我一样,和它初次见面,是在清除浮动的时候:
.clearfix:after{
    content: ".";
    display: block;
    height: 0;
    clear: both;
    visibility: hidden
}
如上所示,content 属性与 :before 及 :after 伪元素配合使用,并可以接受一个字符串作为值。
然而,除了字符串之外,还能接受什么样的值呢?
定义和用法
content 属性与 :before 及 :after 伪元素配合使用,来插入生成内容。
该属性用于定义元素之前或之后放置的生成内容。默认是行内内容,不过可以用属性 display 控制。
可能的值
none、normal、inherit、string、url()、attr()、[no-]open-quote、[no-]close-quote、counter[s]
其中none、normal、inherit这三个和大多数属性类似,故不做介绍。
string
string是常见的,上面清除浮动的例子,就是其中之一。
url()
url的用法,和background属性有点类似,可以接受一个图片url。不一样的是,content属性无法控制图片的大小。
<div class="logo">Google</div>

.logo:before{
    content: url(https://www.google.com/images/branding/googlelogo/1x/googlelogo_color_272x92dp.png);
}
attr
attr,顾名思义,就是将content内容设置为对应元素的某一属性。
<p>
    <span data-text='半'>半</span>
    <span data-text='边'>边</span>
    <span data-text='效'>效</span>
    <span data-text='果'>果</span>
</p>

span{
    font-size: 100px;
    font-weight: bold;
    position: relative;
    color: #000;
}
span:before{
    content: attr(data-text);
    color: #F00;
    position: absolute;
    left: 0;
    top: 0;
    width: 50%;
    overflow: hidden;
}

quote · 引号
[no-]open-quote、[no-]close-quote,这四个值,常用于给元素前后加上引号,配合quotes 属性一起使用。
<p>鲁迅曾经说过: <span>能用CSS解决的问题就不要使用JS。<span>呵呵,谁说的?<span class="no-quote">呵呵,谁说的?</span></span></span></p>

span {
    quotes: '“''”''‘''’''"''"';
}
span:before {
    content: open-quote;
}
span:after {
    content: close-quote;
}
.no-quote:after{
    content: no-close-quote;
}
其中,quotes属性定义要使用的引号。两两一组,前两个值规定第一级引用嵌套,后两个值规定下一级引号嵌套。如此类推。
需要注意的是,只有当伪元素:before设置content的值为open-quote才会有效果。

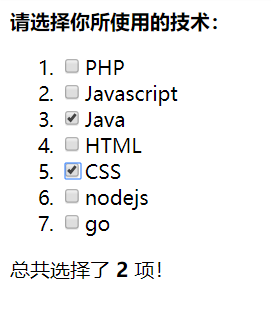
counter[s] · 计数器
这是一个很强大的东西,不妨先来体验一下其强大的力量,1
2
3
4
5
6
7
8
9
10
11<strong>请选择你所使用的技术:</strong>
<ol>
<li><input type="checkbox" id="item1"><label for="item1">PHP</label></li>
<li><input type="checkbox" id="item2"><label for="item2">Javascript</label></li>
<li><input type="checkbox" id="item3"><label for="item3">Java</label></li>
<li><input type="checkbox" id="item4"><label for="item4">HTML</label></li>
<li><input type="checkbox" id="item5"><label for="item5">CSS</label></li>
<li><input type="checkbox" id="item6"><label for="item6">nodejs</label></li>
<li><input type="checkbox" id="item7"><label for="item7">go</label></li>
</ol>
总共选择了 <strong class="total"></strong> 项!
1 | ol{ |
与其搭配使用的,还有counter-reset、counter-increment两个属性。
counter-reset
用来标识计数器的作用域,值包括两部分:第一部分为计数器的名字;第二部分为计数器的起始值,默认为0。此外,counter-reset还可以同时声明多个计数器
counter-reset: n 0
counter-reset: n 2
counter-reset: n 0 m 0 p 0
counter-increment
用来表明计数器实际用到的范围,值包括两部分:第一部分为计数器的名字;第二部分为计数器的递增的值,默认为1。如:
counter-increment: n 2
counter-increment: n -1 /*递减*/
那counter和counters有什么不一样呢?
counter()
counter方法可以接收两个参数。第一个是计数器的名字,必填;第二个是计数器的样式,也就是list-style-type,其支持的关键字值,就是list-style-type支持的那些值,比如disc | circle | square之类等等。
content: counter(n)

content: counter(m, circle)
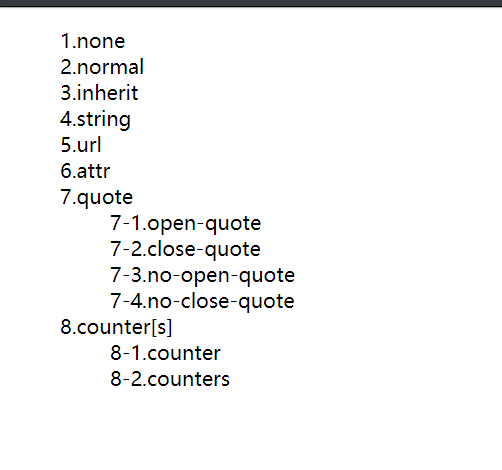
counters()
counters方法主要用于嵌套计数,可以接收三个参数。第一个是计数器的名字,必填;第二个是字符串,用于嵌套计数的分隔符,如1.1中的“.”;第三个参数是计数器的样式,与counter一样。其中,前两个参数为必填
content: counters(n, '-');
说了这么多,还是1
2
3
4
5
6
7
8
9
10
11
12
13
14
15
16
17
18
19
20
21
22<ul>
<li>none</li>
<li>normal</li>
<li>inherit</li>
<li>string</li>
<li>url</li>
<li>attr</li>
<li>quote
<ul>
<li>open-quote</li>
<li>close-quote</li>
<li>no-open-quote</li>
<li>no-close-quote</li>
</ul>
</li>
<li>counter[s]
<ul>
<li>counter</li>
<li>counters</li>
</ul>
</li>
</ul>
1 | ul{ |
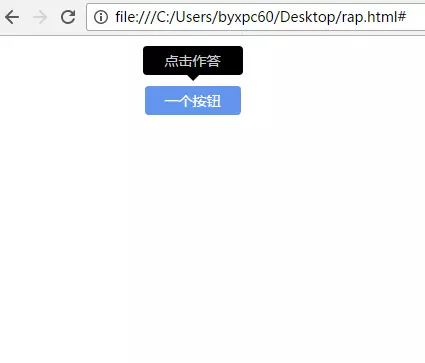
tips
那具体怎么用呢,给大家举个栗子,前段时间刚好用到的,给按钮实现提示功能,就是鼠标放上去后,出来个小提示:1
2
3<div class="wrap">
<a href="#" class="btn" data-tip="点击作答">一个按钮</a>
</div>
1 | .btn { |
当然attr()还可以获取更多的其他属性,比如a标签里的href属性等,更多的用法大家自行尝试吧。